


Develop a blog using ASPNET vNext, Azure Website, DocumentDB and Search services - Part 1
06 Oct 2014 in ASP.NET MVC | Microsoft AzureThanks to Adrien that reviews this blog post before I publish it !
Introduction
Few years ago I chose to develop my own blog instead of using a well-known blog engine like WordPress or DotNet Blog Engine, for example. Why? Because I use it as a sandbox project to test new Microsoft technologies. Today this blog is running in a Microsoft Azure Website, using SQL Database and Azure storage and is developed with ASP.NET MVC 5. I’m currently rewriting it with ASP.NET vNext (MVC 6), Azure DocumentDB and Azure Search. In this blog post series I will describe how I use these technologies to put the new version of my blog online ![]() ## Getting started with ASP.NET vNext
## Getting started with ASP.NET vNext
What is ASP.NET vNext ?
ASP.NET vNext (also known as Project K) will be a really big change for developers because it has been redesigned from the beginning. ASP.NET has always been an awesome and powerful technology to develop web applications but today, after a lot of evolutions, it is very monolithic and has a big memory footprint even to create a simple web application. One of the goal of the ASP.NET team was to reduce this footprint and make the framework more composable, instead of having a huge library that contains a lot of (needed) stuff: System.Web. ASP.NET vNext comes with ASP.NET MVC 6, a web application Framework that merges ASP.NET MVC, Web API and Web Pages. Applications will be host agnostic exactly as ASP.NET Web API is today: you can host it in IIS, or self-host it in a console application, for example. Because the Framework is totally composable, you will have to change some of your development habits. ASP.NET vNext projects use NuGet to resolve all dependencies, even .NET Framework dependencies. One of the coolest thing (IMO) that comes with this new version is the Cloud Optimized .NET Framework: an 11MB Framework divided into a set of NuGet packages that you can include (or not) in your project. That contributes to reduce the memory footprint of your applications but also allow to run applications that use different versions of the .NET Framework side-by-side. ASP.NET vNext uses the Roselyn compiler to build web applications dynamically so it comes with a better development experience. You can choose your editor and your favorite platform to develop your application. The ASP.NET team has worked with the Mono team to make ASP.NET vNext and the Roselyn compiler available on Mac and Linux: come as you are and develop web app with ASP.NET! Even if it looks like being a huge update of ASP.NET (and it is!), don’t be afraid: if you know ASP.NET MVC or Web API, you will develop with ASP.NET vNext finger in the nose J If you don’t know ASP.NET MVC, take the time to read some stuff about it before this article. ### Wow, that looks awesome, how do I start ?
Currently, one of the ways to develop ASP.NET vNext is to download the latest CTP of Visual Studio 14 from this page. You can also use one of the templates available in the this page. Once you have Visual Studio 14 CTP (or your favorite IDE, for those who are using a Mac, this article may be helpful: this page) you are ready to develop with ASP.NET vNext. ## Create the services on Azure portal
The blog uses different services on Microsoft Azure: - Website : the blog application host - Storage account : images displayed in the blog posts are stored in the Azure blob storage - DocumentDB : a NoSQL document database used to store the blog posts - Search : service that provides fast-search indexing and querying, used to search in blog’s posts
All these services are currently available on the preview of the new Azure Portal. You can access it at http://portal.azure.com. One of the coolest features that comes with this new portal is the possibility to group resources by business application into resource groups. So in the example of the blog it is possible to regroup each service instance in a single group and manage them together. Also, resource groups are very useful to get a pricing overview of your business app. After selecting your subscription, click on the + button at the bottom left of the portal and choose to create a new website. First, you have to name the website. Next you can choose a hosting plan that will determine the pricing rules that will apply for billing (I choose free plan in this case). Now you can create a new resource group: <ol> - Click Resource group - Click Create a new resource group - Give a name to the group and click OK
</ol> 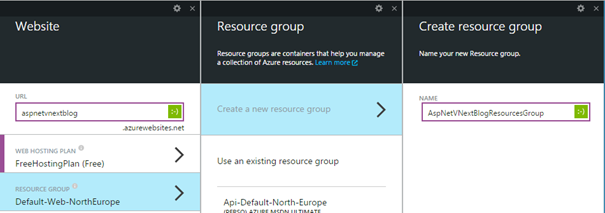
Choose the subscription and the location where you want to create the website. I choose West Europe. Finish the website creation by clicking on Create. While the website is being created, click the + button again to add a new Storage account resource. Choose a name, the tiers you want and select the resource group that you have created with the website: 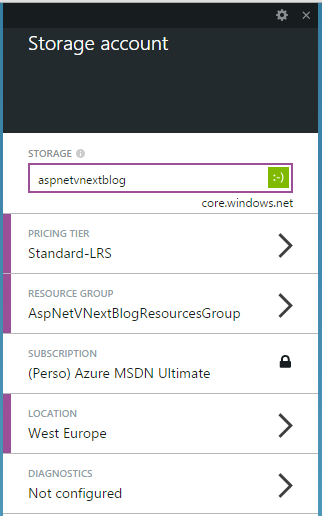
Click Create to finish the Storage account creation. Add a new DocumentDB to the resource group. Click the + button, choose DocumentDB in the list. Give it a name, select the good resource group and the location where your want to create it: 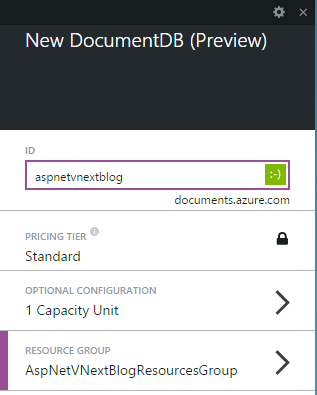
Finish the creation by clicking on Create. Notes: DocumentDB and Search services are currently in preview. If you don’t see them in the Azure Portal, you have to activate them on your subscription via the preview features portal.Create a new Search service in the resource group: click the + button, choose Search in the list. Give it a name, choose the tiers, the resource group and the location where you want to create it: the preview features portal
Conclusion
Your environment is now ready to develop with ASP.NET vNext, Azure Website, DocumentDB and Search services. In the next post, we will create the blog domain model and develop the data access services on Azure DocumentDB. Julien ![]()