


Azure Media Services : enable dynamic PlayReady content protection on your assets
20 Nov 2014 in Microsoft AzureAs you maybe already know, Azure Media Services (AMS) has a feature called dynamic packaging that enables to stream a multi-bitrate asset as Smooth Streaming, HLS or MPEG-Dash dynamically, without storing an asset for each package format. Recently Microsoft added a new feature called dynamic content protection that allows to protect a content dynamically using AES or PlayReady DRM. In this post, I am going to explain how to enable PlayReady encryption, publish the asset and play it with the Silverlight player that has been updated by the AMS team to support PlayReady.
I wrote this post using the lot of samples provided on GitHub by the Azure Media Services team (thanks to them!) and the code of the on GitHub by the Azure Media Services team, so it may have some code that I took directly from these samples ![]()
All the code of this blog post is available on my GitHub.
Overview of dynamic content protection
The feature is currently in preview on Microsoft Azure, so you have to enable it for your subscription if you want to use it. To do that, go to http://azure.microsoft.com/en-us/services/preview/ and search for Content Protection. Then click the Try it button and follow the steps to enable the feature :
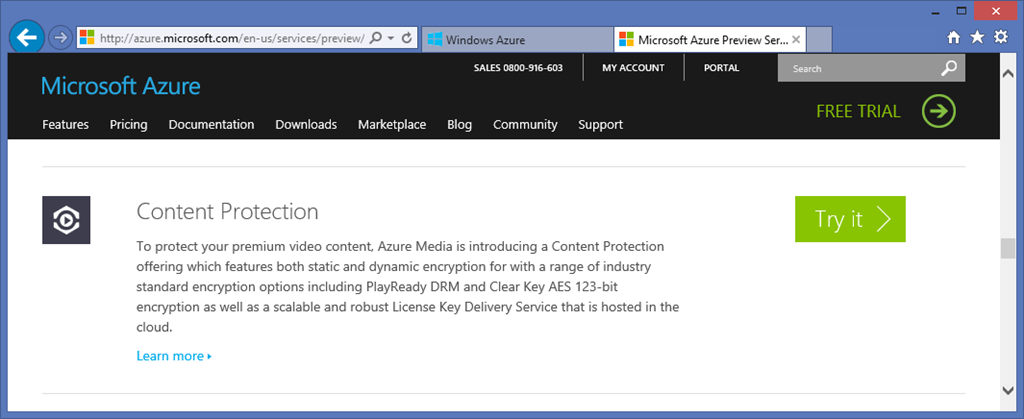
Once done, you are ready to play with PlayReady ![]()
There are two way to work with PlayReady in AMS. The first one is to use an external PlayReady license server to deliver the license (maybe you already have one for your services, so you can keep using it!). The second one is to use the license server that is hosted on Azure Media Services and protect the access to the service via a secure token service (like Azure Access Control or any other STS that can deliver SWT tokens). I am going to present the second way in this post.
The workflow to enable dynamic protection on a media asset is the following :
- - Upload your asset in the Azure BLOB storage - Encode the asset in a multi-bitrate file to use dynamic packaging - Generate content keys and content delivery policy on the asset and configure PlayReady - Create a locator to be able to stream the asset dynamically
### Configure your media service in the Azure portal
Before starting to work with PlayReady, you need to configure your media service to be able to work with the STS that will deliver tokens. If you want to use ACS you can follow this post. In this article I will use a simple class to deliver tokens in my application.
Go on http://manage.windowsazure.com and select your media service. Go to the CONTENT PROTECTION tab. In the middle of the page you should see the PlayReady configuration :
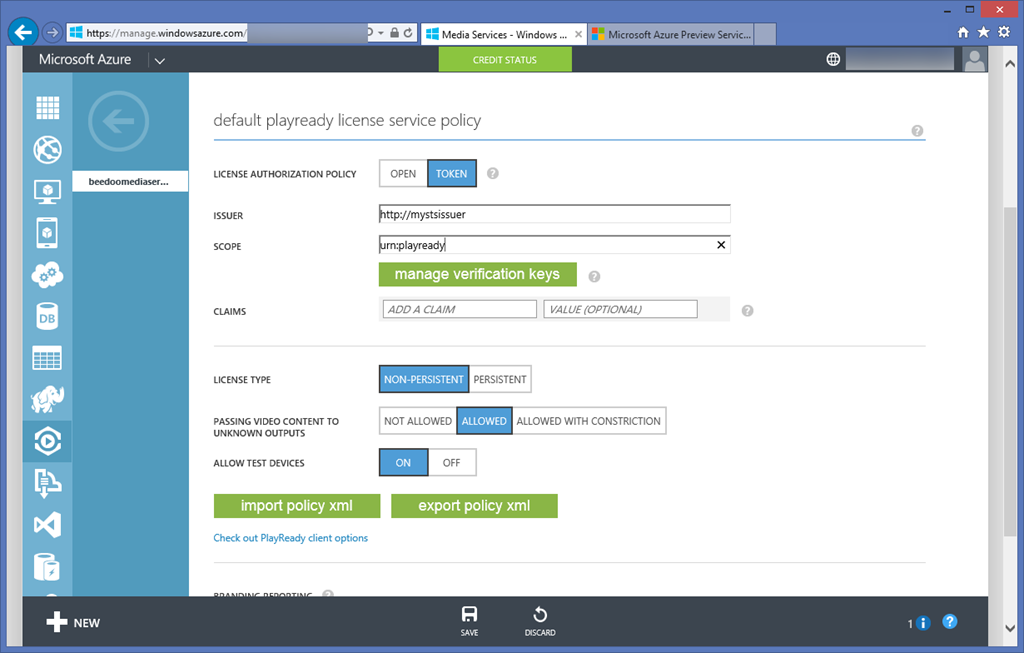
For the license authorization policy, choose Token. This option tells Azure Media Services that it should validate a bearer token when the client call the PlayReady license server.
The issuer represents the name or URI of the STS that will generates the token, and the scope (or audience) represents the scope that is given to the token when it is issued.
Click on the manage verification keys button. In the primary verification key field put the key that will be used by the STS to sign the token :
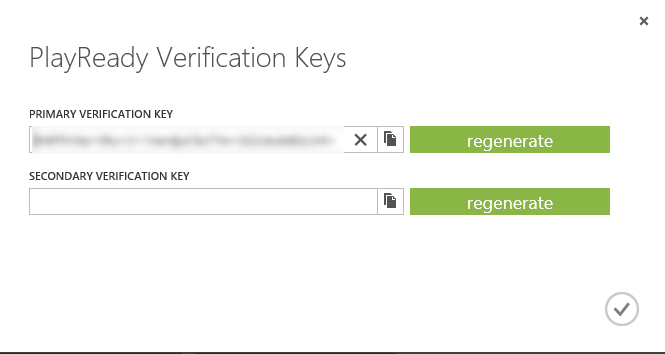
Eventually you can add a secondary validation key in case of the first one get compromised.
All these information will make Media Services able to validate the token that your player will pass in header when calling the PlayReady license through the license server.
Your media service is ready to work with PlayReady.
Deliver Simple Web Token (SWT)
As they are named, SWT are really simple token that are easy to exchange on the http protocol. They should contains at least :
- An issuer - An audience (scope) - An expiration date - A HMAC of all the parameters to ensure the token has not been compromised
If needed you can also pass a list of claims to the token.
All these parameters are URL encoded and represented in a simple query string : Issuer=your_issuer&Audience=your_audience etc…
The following class is a sample of Simple Web Token implementation :
/// <summary>
/// Represents a simple web token
/// </summary>
public class SimpleWebToken
{
private static readonly DateTime epochStart =
new DateTime(1970, 01, 01, 0, 0, 0, 0, DateTimeKind.Utc);

private NameValueCollection claimsCollection;
private byte[] signingKey = null;

/// <summary>
/// Initializes a new instance of the <see cref="SimpleWebToken"/> class.
/// </summary>
/// <param name="base64Key">The base64 key used to sign the token.</param>
/// <param name="ttl">The time to live.</param>
public SimpleWebToken(string base64Key, TimeSpan ttl)
{
TimeSpan ts = DateTime.UtcNow - epochStart + ttl;
this.ExpiresOn = Convert.ToUInt64(ts.TotalSeconds);
this.claimsCollection = new NameValueCollection();

var securityKey = new InMemorySymmetricSecurityKey(Convert.FromBase64String(base64Key));
signingKey = securityKey.GetSymmetricKey();
}

/// <summary>
/// Gets or sets the issuer.
/// </summary>
public string Issuer { get; set; }

/// <summary>
/// Gets or sets the audience.
/// </summary>
public string Audience { get; set; }

/// <summary>
/// Gets or sets the signature.
/// </summary>
public byte[] Signature { get; set; }

/// <summary>
/// Gets the expires on.
/// </summary>
public ulong ExpiresOn { get; private set; }

/// <summary>
/// Gets the claims.
/// </summary>
/// <value>
/// The claims.
/// </value>
public IList<Claim> Claims
{
get
{
return this.claimsCollection.AllKeys
.SelectMany(key =>
this.claimsCollection[key].Split(',')
.Select(value => new Claim(key, value)))
.ToList();
}
}

/// <summary>
/// Adds the claim.
/// </summary>
/// <param name="name">The name.</param>
/// <param name="value">The value.</param>
public void AddClaim(string name, string value)
{
this.claimsCollection.Add(name, value);
}

/// <summary>
/// Returns a <see cref="System.String" /> that represents this instance.
/// </summary>
/// <returns>
/// A <see cref="System.String" /> that represents this instance.
/// </returns>
public override string ToString()
{
StringBuilder content = new StringBuilder();

content.Append("Issuer=").Append(this.Issuer);

foreach (string key in this.claimsCollection.AllKeys)
{
content.Append('&').Append(key)
.Append('=').Append(this.claimsCollection[key]);
}

content.Append("&ExpiresOn=").Append(this.ExpiresOn);

if (!string.IsNullOrWhiteSpace(this.Audience))
{
content.Append("&Audience=").Append(this.Audience);
}

using (HMACSHA256 hmac = new HMACSHA256(signingKey))
{
byte[] signatureBytes = hmac.ComputeHash(
Encoding.ASCII.GetBytes(content.ToString()));

string signature = HttpUtility.UrlEncode(
Convert.ToBase64String(signatureBytes));

content.Append("&HMACSHA256=").Append(signature);
}

return content.ToString();
}
}
In our case, we will use the same issuer, audience and signing key than defined in the Azure Media Services portal.
It’s now really easy to issue a SWT using these information :
Uri issuerName = new Uri(ConfigurationManager.AppSettings["IssuerName"]);
Uri scope = new Uri(ConfigurationManager.AppSettings["Scope"]);
byte[] signingKey = Convert.FromBase64String(ConfigurationManager.AppSettings["SigningKey"]);

var swt = new SimpleWebToken(ConfigurationManager.AppSettings["SigningKey"], TimeSpan.FromMinutes(10));
swt.Audience = scope.ToString();
swt.Issuer = issuerName.ToString();

string token = swt.ToString();
Upload and encode the asset
In this part you will see how to upload an asset in the Azure BLOB storage and launch an encoding job to generate a multi-bitrate asset. First you have to add the media services NuGet package to your solution :
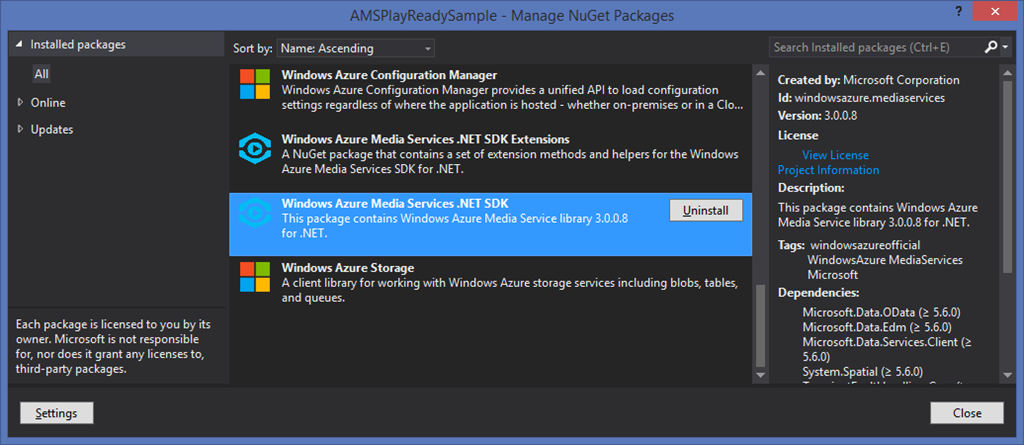
Be sure to also add the SDK Extensions package that give a set of really cool extensions methods for the media services SDK ! ![]()
Creating a media services asset from a file is now really simple using the CreateFromFile extension methods on the assets collection :
string mediaServiceName = ConfigurationManager.AppSettings["MediaServiceName"];
string mediaServiceKey = ConfigurationManager.AppSettings["MediaServiceKey"];

var context = new CloudMediaContext(mediaServiceName, mediaServiceKey);

var asset = context.Assets.CreateFromFile(videoFilePath, AssetCreationOptions.None, (sender, progressChanged) =>
{
Console.WriteLine("{0} of {1} bytes uploaded", progressChanged.BytesUploaded, progressChanged.TotalBytes);
});
Once the asset as been uploaded, you can create a job that contains the encoding task :
IJob job = context.Jobs.CreateWithSingleTask(
MediaProcessorNames.AzureMediaEncoder,
MediaEncoderTaskPresetStrings.H264AdaptiveBitrateMP4Set720p,
asset,
"Adaptive Bitrate MP4",
AssetCreationOptions.None);

job.Submit();
job = job.StartExecutionProgressTask(j =>
{
Console.WriteLine("Job state : {0}", j.State);
Console.WriteLine("Job progress: {0:0.##}%", j.GetOverallProgress());
}, CancellationToken.None).Result;
If you want more explanations about these extensions for media services, you can follow this post.
Configure dynamic PlayReady on the asset
Once the job is done, an output asset is available on it. This asset represents the multi-bitrate file that has been encoded. You can now generates all the stuff needed to enable PlayReady.
First you have to create a Content Key based on the CommonEncryption type :
private static async Task<IContentKey> CreateCommonTypeContentKeyAsync(IAsset asset, CloudMediaContext _context)
{
// Create envelope encryption content key
Guid keyId = Guid.NewGuid();
byte[] contentKey = GetRandomBuffer(16);

IContentKey key = await _context.ContentKeys.CreateAsync(
keyId,
contentKey,
"ContentKey CENC",
ContentKeyType.CommonEncryption);

// Associate the key with the asset.
asset.ContentKeys.Add(key);

return key;
}

private static byte[] GetRandomBuffer(int size)
{
byte[] randomBytes = new byte[size];
using (RNGCryptoServiceProvider rng = new RNGCryptoServiceProvider())
{
rng.GetBytes(randomBytes);
}

return randomBytes;
}
Next you have to generate the token restrictions to associate the issuer, the audience and the signing key of your STS with the content key :
private static List<ContentKeyAuthorizationPolicyRestriction> GetTokenRestrictions(string name, Uri issuer, Uri scope, byte[] signingKey)
{
TokenRestrictionTemplate tokenTemplate = new TokenRestrictionTemplate();
tokenTemplate.Issuer = issuer;
tokenTemplate.Audience = scope;
tokenTemplate.PrimaryVerificationKey = new SymmetricVerificationKey(signingKey);

string requirements = TokenRestrictionTemplateSerializer.Serialize(tokenTemplate);

List<ContentKeyAuthorizationPolicyRestriction> restrictions = new List<ContentKeyAuthorizationPolicyRestriction>()
{
new ContentKeyAuthorizationPolicyRestriction()
{
KeyRestrictionType = (int)ContentKeyRestrictionType.TokenRestricted,
Requirements = requirements,
Name = name
}
};

return restrictions;
}
Now you have to get the template of PlayReady license you will use. Media Services SDK offers a set of classes to make it easy :
private static string ConfigurePlayReadyLicenseTemplate()
{
PlayReadyLicenseResponseTemplate responseTemplate = new PlayReadyLicenseResponseTemplate();
PlayReadyLicenseTemplate licenseTemplate = new PlayReadyLicenseTemplate();
licenseTemplate.PlayRight.AllowPassingVideoContentToUnknownOutput = UnknownOutputPassingOption.Allowed;
responseTemplate.LicenseTemplates.Add(licenseTemplate);

return MediaServicesLicenseTemplateSerializer.Serialize(responseTemplate);
}
These helper methods are used like the following :
private static async Task ConfigurePlayReadyDynamicEncryptionAsync(
CloudMediaContext cloudMediaContext,
IAsset outputAsset,
Uri issuerName,
Uri scope,
byte[] signingKey)
{
IContentKey contentKey = null;
var assetContentKeys = outputAsset.ContentKeys
.Where(c => c.ContentKeyType == ContentKeyType.CommonEncryption);

if (!assetContentKeys.Any())
{
contentKey = await CreateCommonTypeContentKeyAsync(outputAsset, cloudMediaContext);
}
else
{
contentKey = assetContentKeys.First();
}

var tokenRestrictions = GetTokenRestrictions(
"My STS Token Restrictions",
issuerName,
scope,
signingKey);

var playReadyLicenseTemplate = ConfigurePlayReadyLicenseTemplate();

IContentKeyAuthorizationPolicyOption policyOption = await
cloudMediaContext.ContentKeyAuthorizationPolicyOptions.CreateAsync(
"Option with Token Restriction",
ContentKeyDeliveryType.PlayReadyLicense,
tokenRestrictions,
playReadyLicenseTemplate);

IContentKeyAuthorizationPolicy policy = await cloudMediaContext
.ContentKeyAuthorizationPolicies
.CreateAsync("ACS Authorization Policy");

policy.Options.Add(policyOption);
await policy.UpdateAsync();

contentKey.AuthorizationPolicyId = policy.Id;
await contentKey.UpdateAsync();

var licenseAcquisitionUrl = await contentKey.GetKeyDeliveryUrlAsync(ContentKeyDeliveryType.PlayReadyLicense);
string strLicenseAcquisitionUrl = System.Security.SecurityElement.Escape(licenseAcquisitionUrl.ToString());

Dictionary<AssetDeliveryPolicyConfigurationKey, string> assetDeliveryPolicyConfiguration =
new Dictionary<AssetDeliveryPolicyConfigurationKey, string>
{
{
AssetDeliveryPolicyConfigurationKey.PlayReadyLicenseAcquisitionUrl, strLicenseAcquisitionUrl
},
};

var assetDeliveryPolicy = await cloudMediaContext.AssetDeliveryPolicies.CreateAsync(
"PlayReady Delivery Policy",
AssetDeliveryPolicyType.DynamicCommonEncryption,
AssetDeliveryProtocol.SmoothStreaming,
assetDeliveryPolicyConfiguration);

outputAsset.DeliveryPolicies.Add(assetDeliveryPolicy);
await outputAsset.UpdateAsync();

}
As you can see, once you have the content key, the token restrictions and the PlayReady license to use, you can easily create the content key authorization policy and associate it to the content key. The next step is to create the content delivery policy to make the Media Services PlayReady licenses server able to generate the PlayReady license for your content.
Dynamic encryption with PlayReady is now configured !
Publish the asset
The last step is the asset’s publication. If you have already done this without PlayReady you will see that it works exactly in the same way. First, you have to create an access policy in your media services :
var accessPolicy = context.AccessPolicies
.Where(a => a.Name == "catchup_policy")
.AsEnumerable()
.FirstOrDefault();

if (accessPolicy == null)
{
accessPolicy = context.AccessPolicies
.Create("catchup_policy", TimeSpan.FromDays(100 * 365), AccessPermissions.Read);
}
Next, you will use this access policy to publish the asset via a locator :
var locator = context.Locators
.CreateLocator(LocatorType.OnDemandOrigin, asset, accessPolicy);

Console.WriteLine(locator.GetSmoothStreamingUri());
Et voilà !
Test the asset with PlayReady encryption
To test your new dynamic PlayReady encrypted asset you can go on http://sltoken.azurewebsites.net (developed by the AMS team, I think). Put the smooth streaming URL of your content and the token your STS has delivered, and it just works :
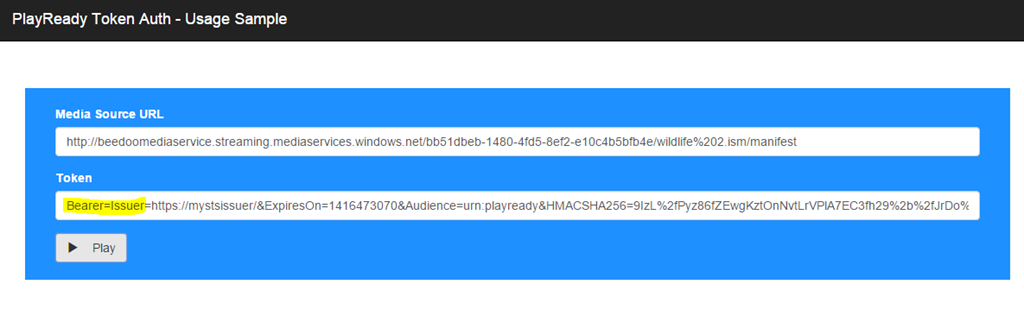
Note : to make the dynamic packaging working you have to enable at least one streaming unit in the streaming endpoint configuration of your media service.
Conclusion
In this blog post we have seen how to upload, encode and protect a content with PlayReady DRM, the new feature available with Azure Media Services. This feature is not yet supported on assets that were recorded from live channels, but in this case you can use AES encryption.
Hope this helps !
Julien