


Build, push and run Docker images with Visual Studio Team Services
19 Aug 2016 in DevOps | DockerVisual Studio Team Services (VSTS) is a great tool to handle your build and release pipelines, even for non Windows applications. In this post I will detail how you can use the Docker extension for VSTS to build, push and run Docker images on Linux.
Get the Docker task
As you maybe already know, Visual Studio Team Services comes with a Marketplace where you can find some tasks and extensions for your build and release definitions. The Docker task is available here.
Adding an extension to VSTS is really easy as you just have to click on the Install button:

Note: this extension is also available for Team Foundation Server, so you can download it and install it on your on premise server, if needed.
If you are not already logged in you will be asked for your credentials. Once authenticated, you have to choose the VSTS account where you want to install the extension:
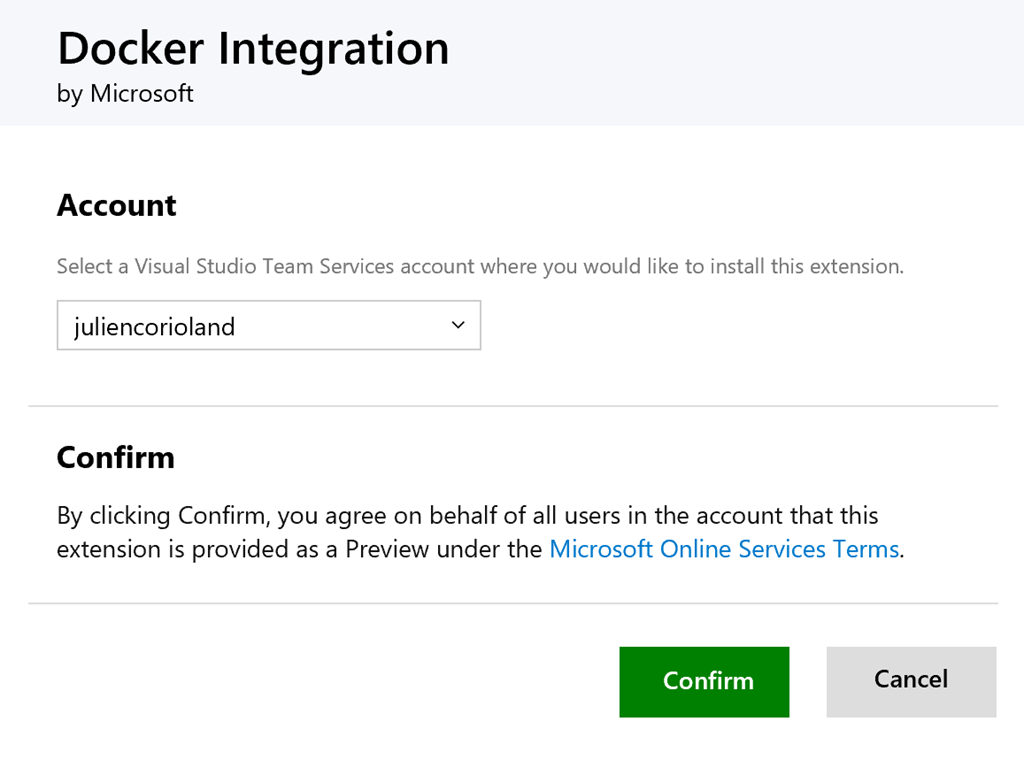
Click on the Confirm button, and you are done!
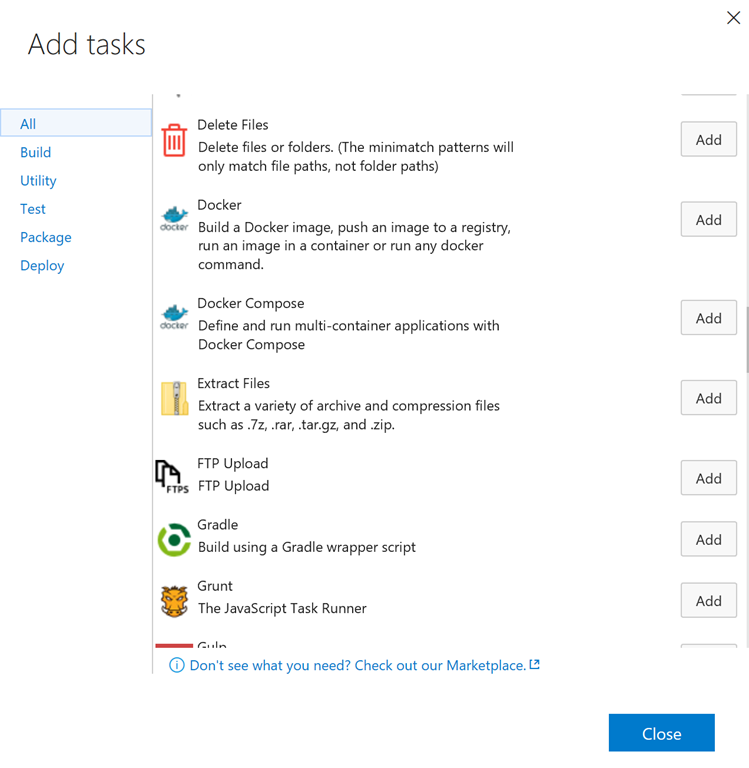
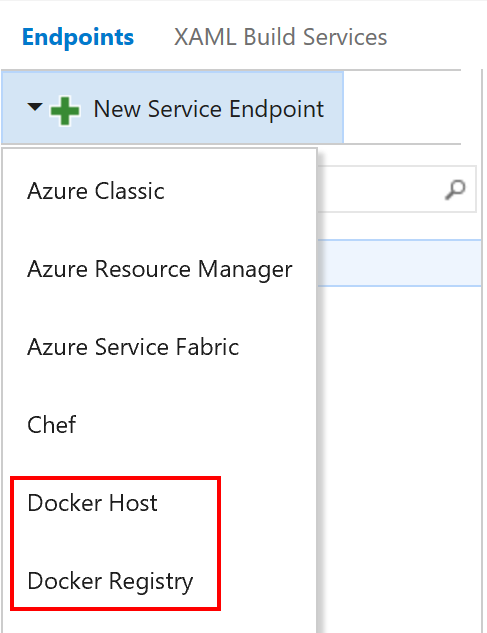
Now, if you create a new Build definition you should see two new extensions available, Docker and Docker Compose:
To use the extension, you need to configure two external services in VSTS:
- A Docker host that will be used to build, push, run the images
- A Docker Hub/Registry connection to store the image
You also need a build agent that has the Docker command line installed. For this article I have used the same Linux box for both the Docker host and VSTS agent and I have used the public Docker Hub to store the images.
Create and configure a Linux build agent
Visual Studio Team Services supports hosted agents (provided by Microsoft and running Windows) and custom agents that can run Windows, Linux or Mac OS. Any machine you own, physical or virtual, can be a VSTS agent.
I choose to create an Ubuntu machine in Microsoft Azure using the docker-machine command line. This tool is really easy to use and it allows to have a Docker host up and running in a few minutes! All you need to do to get your Docker host up and running in Azure is described here.
Once done, you can SSH on the machine using the command:
docker-machine ssh machine_name
You need to install some pre-requisites for the VSTS Linux agent, as described here.
Now, you can download the agent from the GitHub release page, depending on the Ubuntu version your are running on (14.04 or 16.04). Once downloaded, create a new folder on the machine, for example vsts-agent and extract the archive in this folder:
mkdir vsts-agent && cd vsts-agent && tar –zxvf vsts-agent-ubuntu.16.04-x64-2.105.1.tar.gz
To be able to authenticate the agent to your VSTS account, you need a personal access token (PAT). To get one, follow this procedure. On your Linux machine, run the config.sh script in the vsts-agent directory:
./config.sh
Follow the different configuration step, enter your VSTS account, the PAT you have just created etc… and then run the run.sh script to start the agent.
Note: if you are running Ubuntu 16.04, the agent can also be ran as a service. The documentation is available on this page.
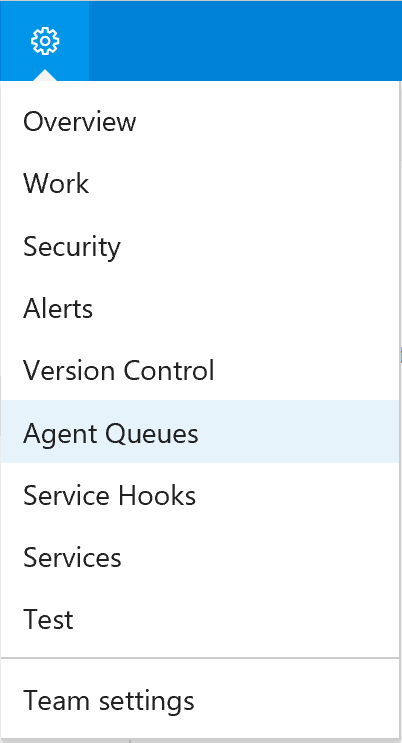
Go in the agent queues settings of your team project and check that your agent is available:
Your build agent is ready!
Use the Docker extension in VSTS
I am working on a multi-containers application and I am using the Docker extension to build and push 4 images from a code source repository that contains one Dockerfile for each image. First, I have created a new build definition (started from an empty one), connected the build definition to my source code repository and configured it to be triggered each time a commit is done.
Then, I had added 8 Docker tasks to the build definition (I need to build and push each image):
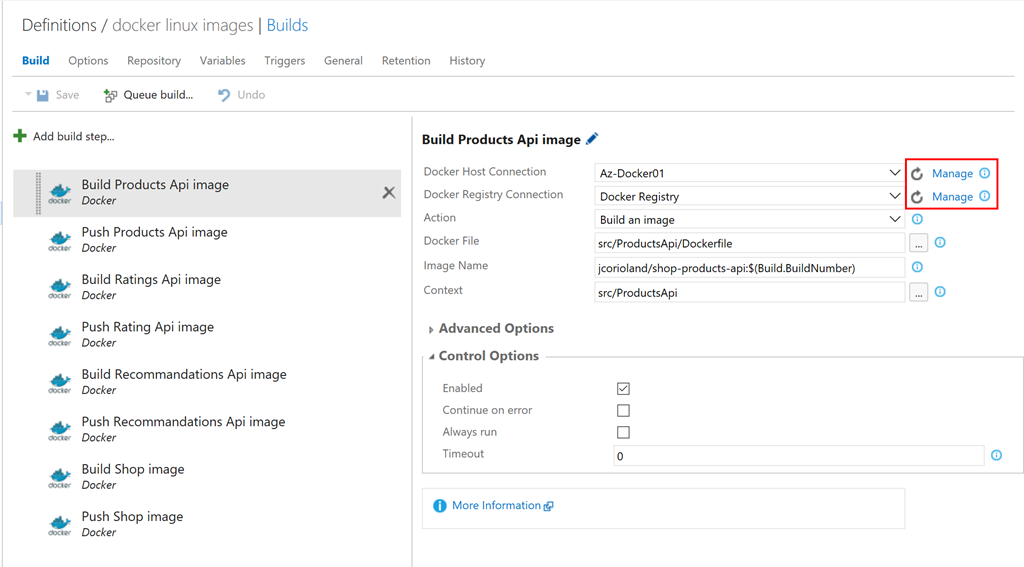
As you can see on the right side of each task occurrence you need to provide a Docker Host Connection (the machine that will build, push, or run the image) and a Docker Registry Connection (a Trusted Registry or Docker Hub account).
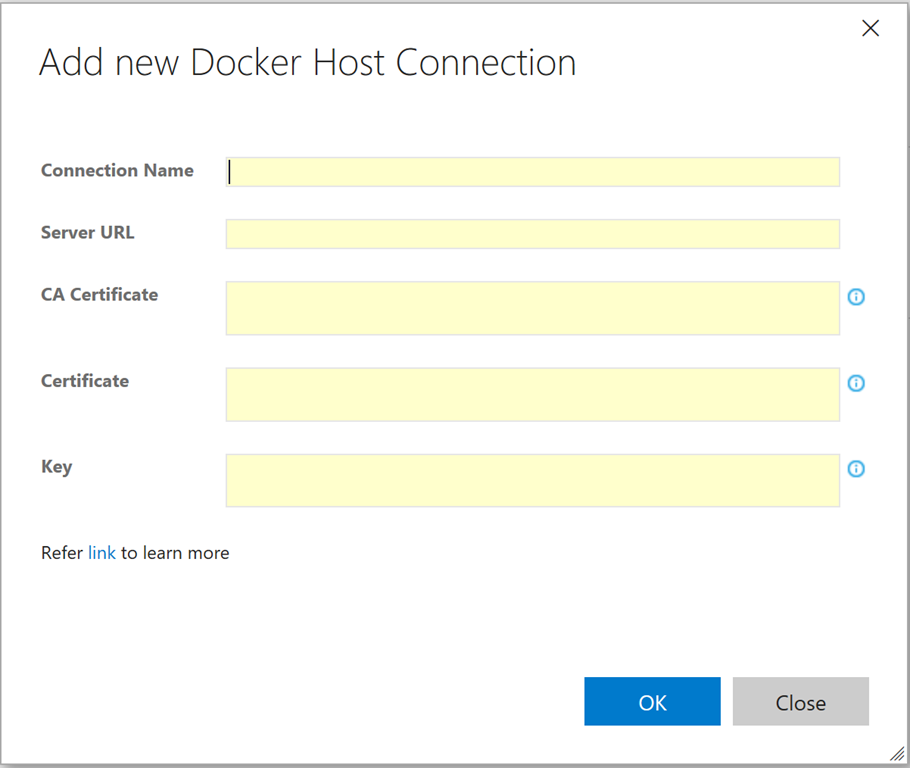
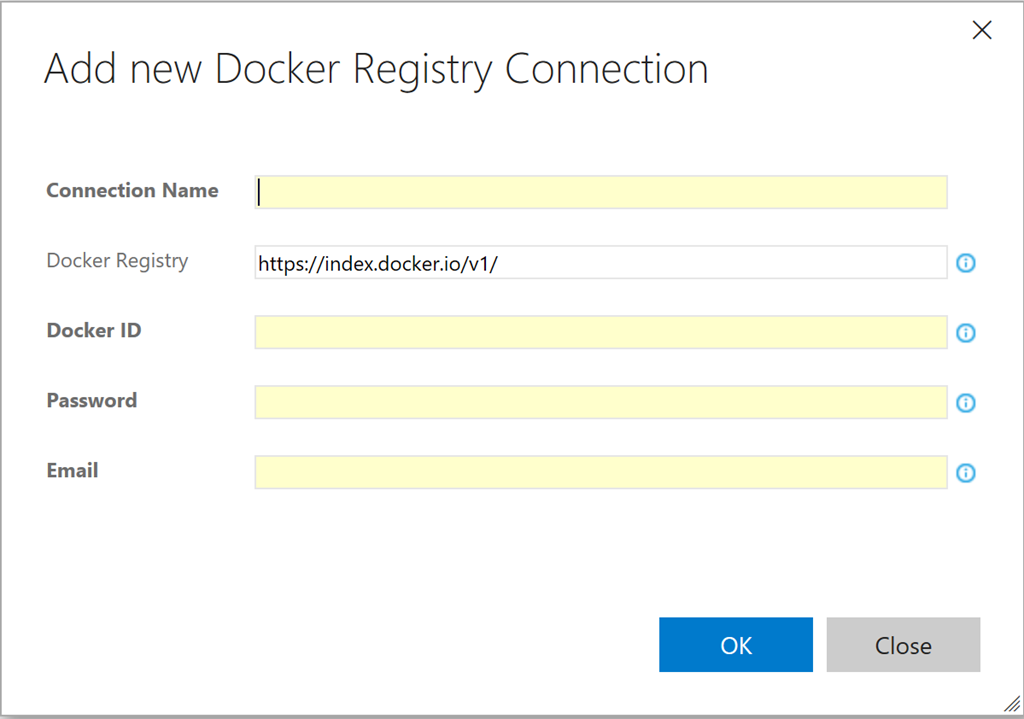
Click on the Manage link to go to the Services management. In this section you can add the information to connect you Docker Host and your Docker Hub account:
For the Docker Host, you need to give a name, the URL of the host and the certificates information to connect to the Docker daemon (those certificates have been generated by docker-machine in your home folder):
The Docker Registry requires your Trusted Registry / Docker Hub account information (and the URL of your trusted registry if you are not using the public hub):
Once configured, go back to the build definition and configure the host / registry on the task. The other options that you need to provide is the path of the Dockerfile, the Docker action you want to execute (build, push, run…) and the context to pass to the Docker daemon.
Here is an example of the Docker task configuration to build an image:

And an example of the Docker task configured to push the image that has been built in the previous step:
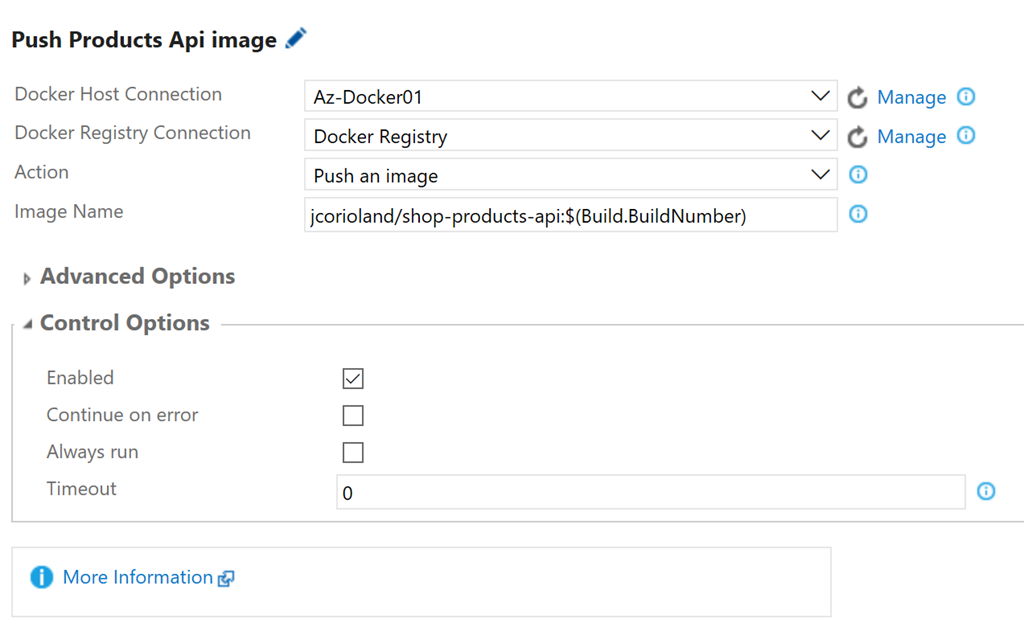
As you can see, I have used the VSTS build number variable to tag the image. The build is configured, and can be triggered on the agent queue that contains the custom agent:

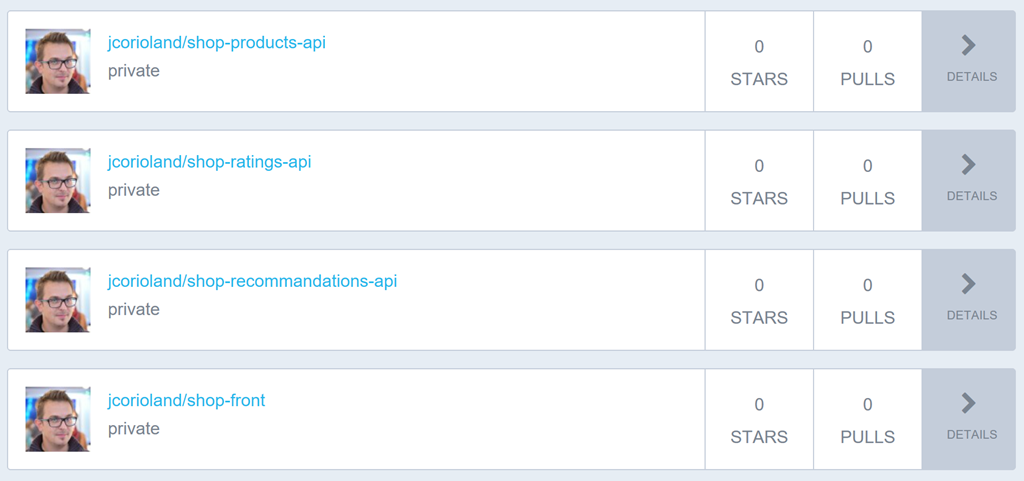
Once the build is done, the four images are available in the Docker Hub:
Running an image is super easy with the Docker task, you just have to tell the image you want to run:
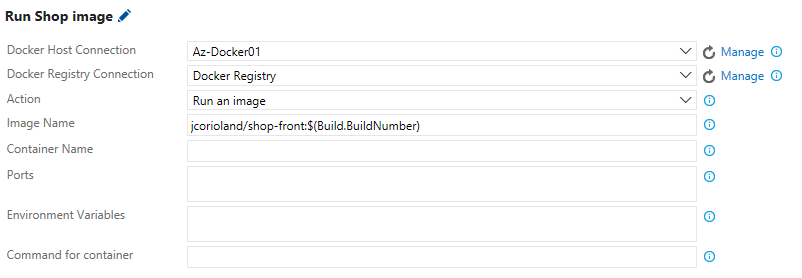
Note: you can also add additional parameters that will be passed to the docker run command, like the name of the container, the port mapping configuration, environment variables and command arguments.
In a future blog post I will explain how to use the Docker Compose task to deploy and run a multi-containers application using Visual Studio Team Services Release Management.
Have fun with Docker and VSTS !