


Kubernetes on Azure: deliver applications continuously with Jenkins and Helm
21 Nov 2017 in DevOps | Kubernetes | Microsoft AzureContinuous deployment is essential in every software development project as it allows the applications being developed to reach the users as fast as possible, with the best quality as possible.
By automating all the steps that allow your applications to be automatically built, packaged, tested and deployed into several environments, you will drastically reduce the risk of having bugs reaching the end users.
In this article, I will explain how you can use tools like Jenkins and Helm to set up a continuous delivery pipeline of a containerized application that runs on Kubernetes.
Prerequesites
Before getting started, you need to have a Kubernetes cluster up and running. If you do not have one, you can follow this tutorial to deploy a managed Kubernetes cluster using Azure Container Service (AKS).
Helm is a package manager for Kubernetes that allows to deploy applications in a smooth way. In this blog post, I will describe how you can use Helm to deploy all the services you need to have a Jenkins server up and running in your Kubernetes cluster. I assume that you already have a Kubernetes cluster running with Helm installed.
If you want to be able to access your Jenkins server using your domain name instead of a public IP address, you need to configure your Kubernetes cluster to use an ingress controller. There are several options available to do that. In this case, I choose to use Traefik. You can follow this tutorial to set it up on your cluster.
Running Jenkins on Kubernetes
Installing Jenkins on Kubernetes is super easy using this Helm chart. You will get everything you need to deploy and integrate Jenkins with the Kubernetes cluster. Jenkins comes with a plugin for Kubernetes, allowing to spin up containers to run Jenkins agents, at build time, instead of having machines up and running 24/7 or having to wait for virtual machines to be started when a new build is triggered.
It is possible to inject Jenkins configuration using a Helm values file:
Master:
  Memory: "512Mi"
  HostName: <jenkins.yourdomain.com>
  ServiceType: ClusterIP
  InstallPlugins:
      - kubernetes:0.12
      - workflow-aggregator:2.5
      - credentials-binding:1.13
      - git:3.6.0
      - pipeline-github-lib:1.0
      - ghprb:1.39.0
      - blueocean:1.3.3

ScriptApproval:
    - "method groovy.json.JsonSlurperClassic parseText java.lang.String"
    - "new groovy.json.JsonSlurperClassic"
    - "staticMethod org.codehaus.groovy.runtime.DefaultGroovyMethods leftShift java.util.Map java.util.Map"
    - "staticMethod org.codehaus.groovy.runtime.DefaultGroovyMethods split java.lang.String"
    - "method java.util.Collection toArray"
    - "staticMethod org.kohsuke.groovy.sandbox.impl.Checker checkedCall java.lang.Object boolean boolean java.lang.String java.lang.Object[]"
    - "staticMethod org.kohsuke.groovy.sandbox.impl.Checker checkedGetProperty java.lang.Object boolean boolean java.lang.Object"

Ingress:
  Annotations:
    kubernetes.io/ingress.class: traefik
    kubernetes.io/tls-acme: "true"

  TLS:
    - secretName: <jenkins.yourdomain.com>
      hosts:
        - <jenkins.yourdomain.com>

Agent:
  Enabled: false
As you can see, this configuration file defines some plugins that need to be installed with Jenkins and also some script approvals that are required to run Jenkins pipelines.
If you are using an ingress controller like Traefik, you need to replace <jenkins.yourdomain.com> in the file above.
If you are not using an ingress controller and want access Jenkins using a public IP address:
- Remove the
HostNameproperty of theMastersection - Remove the entire
Ingresssection from the file - Set the
ServiceTypeproperty toLoadBalancerinstead ofClusterIP
Now, save the settings into a values.yaml file on your computer.
You can now simply use the helm command line to deploy Jenkins:
helm install --name jenkins --namespace jenkins stable/jenkins -f values.yaml
Helm will output some details in the console:
NAME:   jenkins2
LAST DEPLOYED: Tue Nov 21 09:11:15 2017
NAMESPACE: jenkins2
STATUS: DEPLOYED

RESOURCES:
==> v1beta1/Deployment
NAME              DESIRED  CURRENT  UP-TO-DATE  AVAILABLE  AGE
jenkins2-jenkins  1        1        1           0          13s

==> v1beta1/Ingress
NAME              HOSTS                              ADDRESS  PORTS  AGE
jenkins2-jenkins  jenkins2.<yourdomain.com>  80       13s

==> v1/Pod(related)
NAME                               READY  STATUS   RESTARTS  AGE
jenkins2-jenkins-2386989911-vfrlf  0/1    Pending  0         13s

==> v1/Secret
NAME              TYPE    DATA  AGE
jenkins2-jenkins  Opaque  2     14s

==> v1/ConfigMap
NAME                    DATA  AGE
jenkins2-jenkins        3     14s
jenkins2-jenkins-tests  1     14s

==> v1/PersistentVolumeClaim
NAME              STATUS   VOLUME   CAPACITY  ACCESS MODES  STORAGECLASS  AGE
jenkins2-jenkins  Pending  default  13s

==> v1/Service
NAME                    TYPE       CLUSTER-IP    EXTERNAL-IP  PORT(S)    AGE
jenkins2-jenkins-agent  ClusterIP  10.0.145.101  <none>       50000/TCP  13s
jenkins2-jenkins        ClusterIP  10.0.214.101  <none>       8080/TCP   13s


NOTES:
1. Get your 'admin' user password by running:
  printf $(kubectl get secret --namespace jenkins2 jenkins2-jenkins -o jsonpath="{.data.jenkins-admin-password}" | base64 --decode);echo

2. Visit http://jenkins2.<yourdomain.com>

3. Login with the password from step 1 and the username: admin

For more information on running Jenkins on Kubernetes, visit:
https://cloud.google.com/solutions/jenkins-on-container-engine
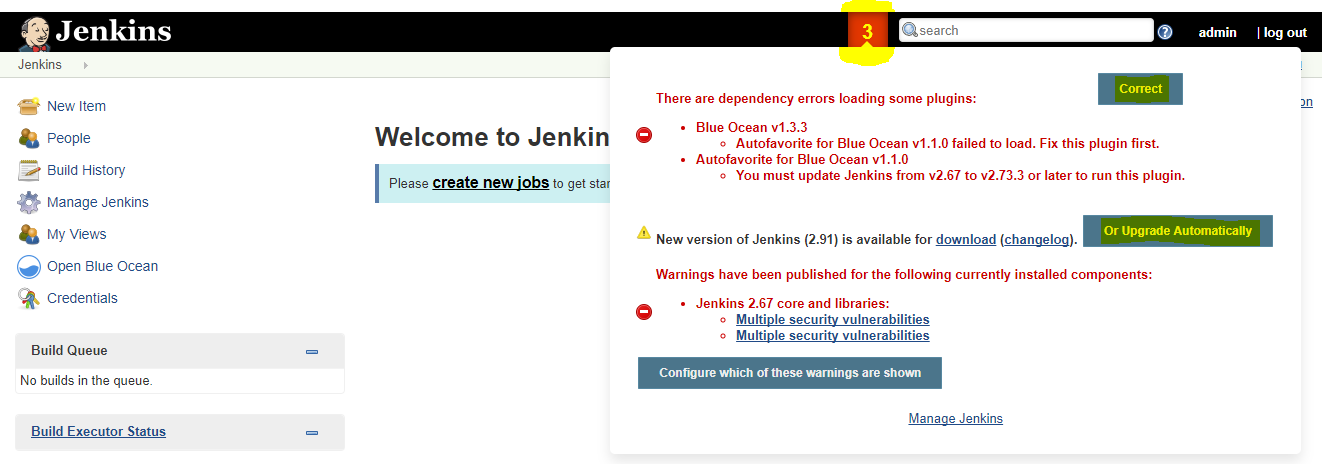
Look at the NOTES to get the command line that will allow to retrieve the admin password.
Connect to your new Jenkins instance. You may have some updates to do:
Kubernetes RBAC
Note: If RBAC is not enabled on your Kubernetes cluster you can skip this part
Kubernetes 1.6 introduces Role Base Access Control security that enables to define which resources is accessible or not by a user or a service, for example. During the deployment of Jenkins, a default service account has been created in the namespace, you can get information about it using the following command:
kubectl describe sa -n jenkins
Result:
Name:         default
Namespace:    jenkins
Labels:       <none>
Annotations:  <none>

Image pull secrets:  <none>

Mountable secrets:   default-token-dbfd4

Tokens:              default-token-dbfd4

Events:  <none>
This service account will require some permissions to be able to manage the pods in the namespace (to be able to spin up/down Jenkins agent) and to configure helm.
For development purpose, you can give the service cluster-admin role, using a cluster role binding:
apiVersion: rbac.authorization.k8s.io/v1beta1
kind: ClusterRoleBinding
metadata:
  name: jenkins
roleRef:
  apiGroup: rbac.authorization.k8s.io
  kind: ClusterRole
  name: cluster-admin
subjects:
- kind: ServiceAccount
  name: default
  namespace: jenkins
kubectl create -n jenkins -f clusterrolebinding.yaml
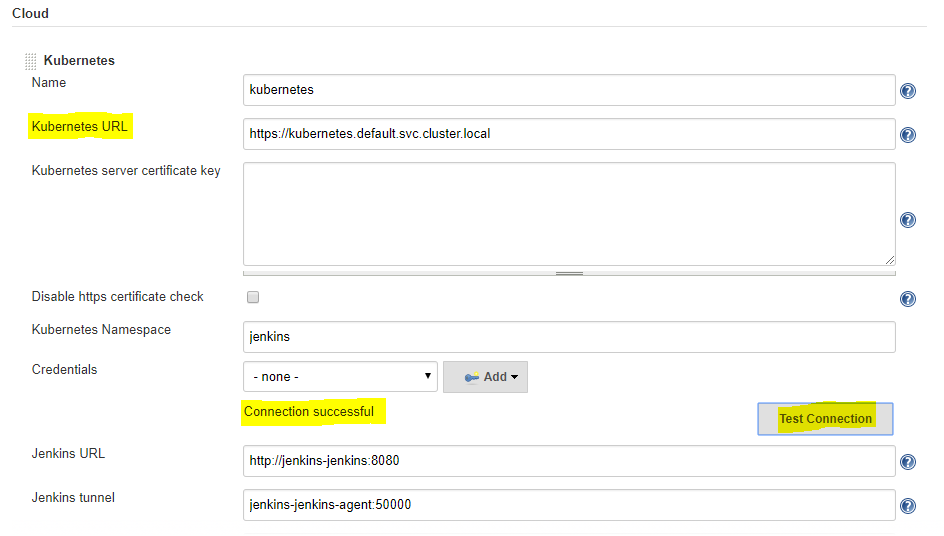
Check the Kubernetes configuration
To make sure everything is OK with the Kubernetes configuration, go into the Jenkins system configuration. Find the Cloud section, ensure the Kubernetes URL is set to https://kubernetes.default.svc.cluster.local and click Test Connection:
Jenkins Pipeline
Jenkins Pipeline allows to implement continuous delivery pipelines as code. Using a Jenkinsfile, it is possible to define and store in your source control the different steps that will be executed to build, package, test and deploy an application.
For this article, I have used a really simple Java SpringBoot application composed by a controller that returns a hello world message. The Jenkins pipeline is defined in this file:
#!/usr/bin/groovy

// load pipeline functions
// Requires pipeline-github-lib plugin to load library from github
@Library('github.com/lachie83/jenkins-pipeline@master')
def pipeline = new io.estrado.Pipeline()

podTemplate(label: 'jenkins-pipeline', containers: [
    containerTemplate(name: 'jnlp', image: 'jenkinsci/jnlp-slave:2.62', args: '${computer.jnlpmac} ${computer.name}', workingDir: '/home/jenkins', resourceRequestCpu: '500m', resourceLimitCpu: '500m', resourceRequestMemory: '1024Mi', resourceLimitMemory: '1024Mi'),
    containerTemplate(name: 'docker', image: 'docker:1.12.6', command: 'cat', ttyEnabled: true),
    containerTemplate(name: 'maven', image: 'maven:3.5.0-jdk-8', command: 'cat', ttyEnabled: true),
    containerTemplate(name: 'helm', image: 'lachlanevenson/k8s-helm:v2.6.1', command: 'cat', ttyEnabled: true),
    containerTemplate(name: 'kubectl', image: 'lachlanevenson/k8s-kubectl:v1.8.3', command: 'cat', ttyEnabled: true)
],
volumes:[
    hostPathVolume(mountPath: '/var/run/docker.sock', hostPath: '/var/run/docker.sock'),
]){

  node ('jenkins-pipeline') {

    def pwd = pwd()
    def chart_dir = "${pwd}/charts/hellojava"
    def tags = [env.BUILD_TAG, 'latest']
    def docker_registry_url = "DOCKER_REGISTRY"
    def docker_email = "DOCKER_EMAIL"
    def docker_repo = "hellojava"
    def docker_acct = "kubernetes"
    def jenkins_registry_cred_id = "acr_creds"

    // checkout sources
    checkout scm

    // set additional git envvars for image tagging
    pipeline.gitEnvVars()

    // Execute Maven build and tests
    stage ('Maven Build & Tests') {

      container ('maven') {
        sh "mvn install"
      }

    }

    // Test Helm deployment (dry-run)
    stage ('Helm test deployment') {

      container('helm') {

        // run helm chart linter
        pipeline.helmLint(chart_dir)

        // run dry-run helm chart installation
        pipeline.helmDeploy(
          dry_run       : true,
          name          : "hello-java",
          namespace     : "hello-java",
          version_tag   : tags.get(0),
          chart_dir     : chart_dir,
          replicas      : 2,
          cpu           : "10m",
          memory        : "128Mi",
          hostname      : "hellojava.k8s-engine.jcorioland.io"
        )

      }
    }

    // Build and push the Docker image
    stage ('Build & Push Docker image') {

      container('docker') {
        println "build & push"

        // perform docker login
        withCredentials([[$class: 'UsernamePasswordMultiBinding', credentialsId: jenkins_registry_cred_id, usernameVariable: 'USERNAME', passwordVariable: 'PASSWORD']]) {
          sh "docker login -e ${docker_email} -u ${env.USERNAME} -p ${env.PASSWORD} ${docker_registry_url}"
        }

        // build and publish container
        pipeline.containerBuildPub(
            dockerfile: "./",
            host      : docker_registry_url,
            acct      : docker_acct,
            repo      : docker_repo,
            tags      : tags,
            auth_id   : jenkins_registry_cred_id
        )
      }
    }

    // Deploy the new version to Kubernetes
    stage ('Deploy to Kubernetes') {
        container('helm') {

          // Deploy using Helm chart
           pipeline.helmDeploy(
            dry_run       : false,
            name          : "hello-java",
            namespace     : "hello-java",
            version_tag   : tags.get(0),
            chart_dir     : chart_dir,
            replicas      : 2,
            cpu           : "10m",
            memory        : "128Mi",
            hostname      : "hellojava.k8s-engine.jcorioland.io"
          )
        }
      }
  }
}
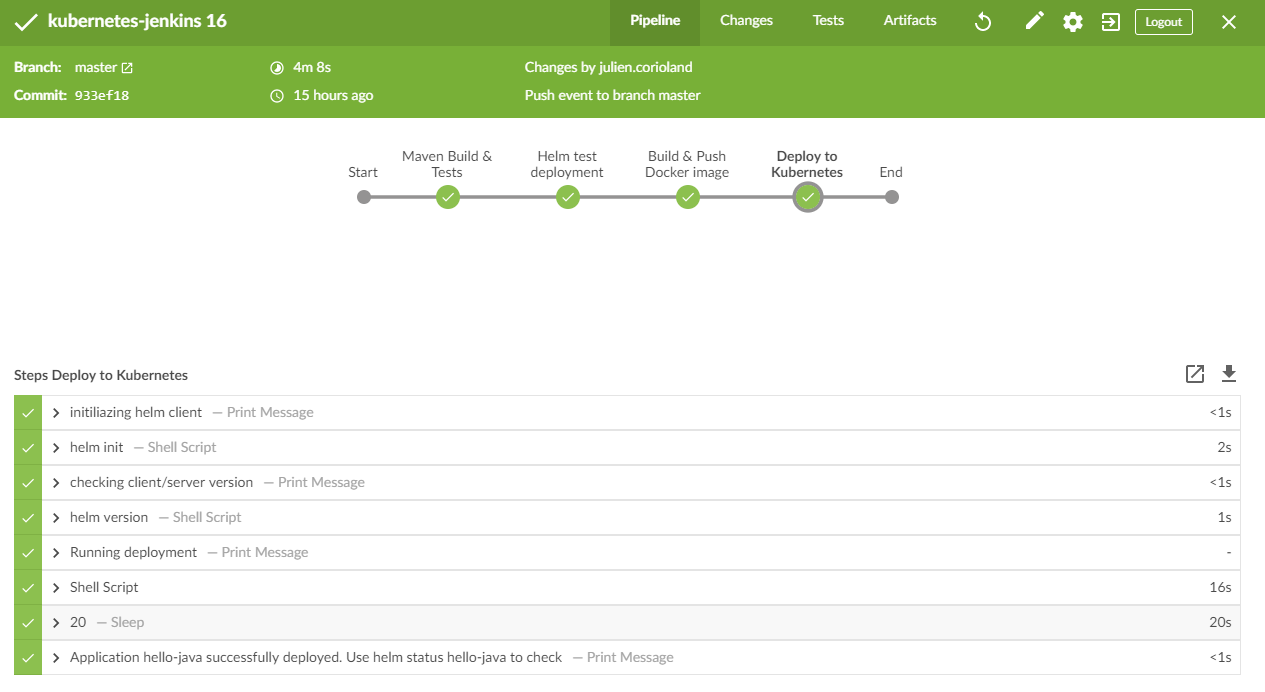
This file is writting in groovy script and defines the different steps of the pipeline:
- Maven Build & Tests: executes the
mvn installcommand - Helm test deployment: executes a dry-run deployment of the application using
helm - Build & Push Docker image: builds and pushes the Docker image of the application
- Deploy to Kubernetes: deploys (or upgrades) the application to Kubernetes using
helm
As you can see, each step requires a container in which the step is going to be executed. This is possible thanks to the Jenkins agents running into containers within the Kubernetes cluster and being able to access the Docker socket. It allows to require a specific image for a specific step. For example, to build the Java application we need Maven. Instead of having to install all the dependencies on the Jenkins agent, we can simply require a container based on the Maven SDK image:
containerTemplate(name: 'maven', image: 'maven:3.5.0-jdk-8', command: 'cat', ttyEnabled: true)

container ('maven') {
  sh "mvn install"
}
Azure Container Registry
The Jenkins pipeline defined below allows to push the Docker image into a private Docker registry. To get a private Docker registry up and running in Azure, the fastest way is to use Azure Container Registry.
Once created, you need to create a secret in Jenkins that defines the credentials to authenticate to this registry:
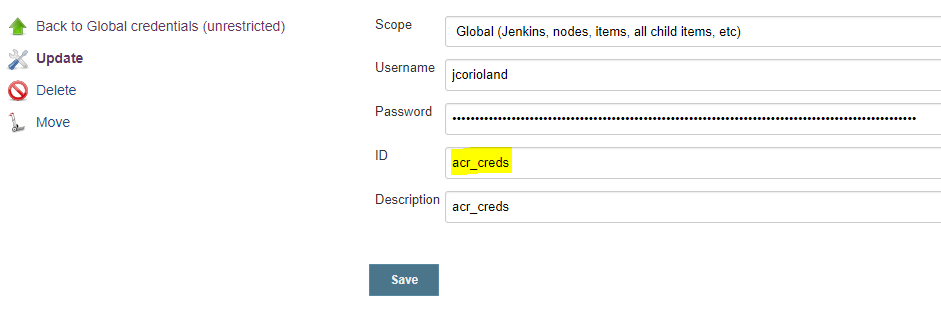
Be careful of the ID you give to this credential. Here I have used acr_creds because it is the name that is also referenced within the Jenkinsfile to get access to this information during the build.
To enable Kubernetes to authenticate to your Azure Container Registry, you need to create a docker registry secret.
Once created, you need to patch the default service of the namespace you are going to deploy the application to make sure it will use this secret by default:
kubectl patch serviceaccount default -p '{"imagePullSecrets": [{"name": "NAME_OF_YOUR_SECRET"}]}' -n YOUR_NAMESPACE
Create the Jenkins Pipeline
Now, you can open Jenkins Blue Ocean and create a new Jenkins Pipeline:
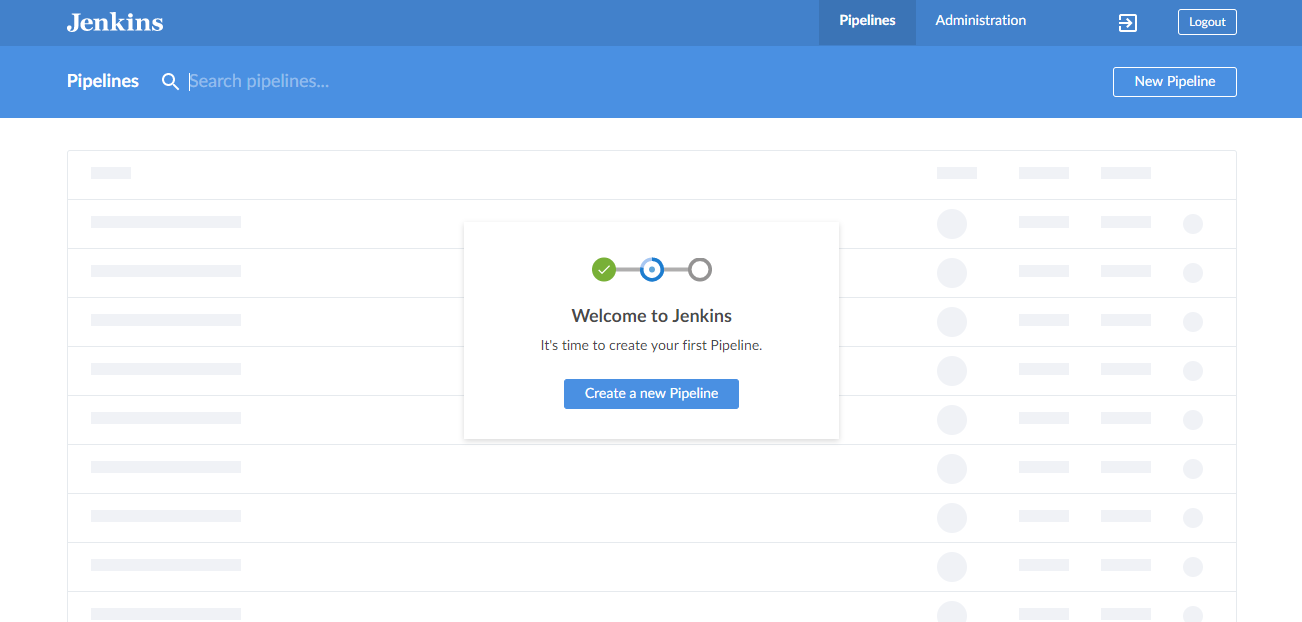
Follow the steps to connect your GitHub account (or any other supported source control) and select the project where the Jenkinsfile has been defined. It will be automatically discovered by Jenkins. Once done, click create pipeline. It will trigger a new build automatically.
After a while, you should see some new pods being created in the namespace where you have installed Jenkins:
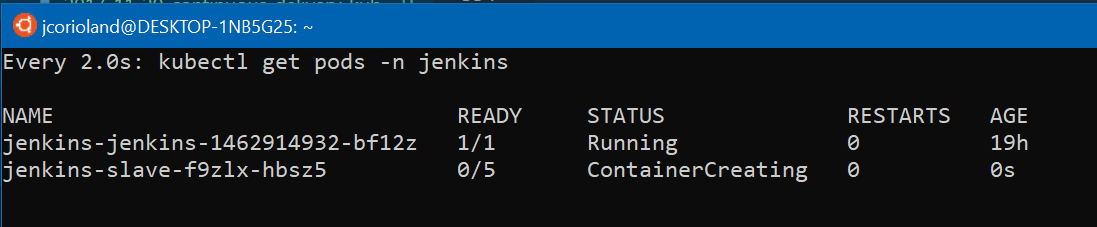
These are the Jenkins agents where the build is running.
You just have to wait until the build is completed:
If you want a new build to be triggered automatically, go into your repository web hooks settings and configure a new web hook to be sent to http://<your-jenkins-url/github-webhook/ (don’t forget the final /).
Your continuous delivery pipeline is now ready!