


Secure an Azure Kubernetes cluster with Azure Active Directory and RBAC
20 Nov 2018 in Kubernetes | Microsoft AzureAzure Kubernetes Services supports Kubernetes RBAC with Azure Active Directory integration, that allows to bind ClusterRole and Role to subjects like Azure Active Directory users and groups.
The version 1.19.0 of the AzureRM Terraform provider supports this integration.
This blog post describes how to script the deployment of an AKS cluster, using RBAC + Azure AD with Terraform and Azure CLI.
All the scripts are in this GitHub repository.
Azure Active Directory
Before getting started, read this documentation page that explains how to configure AKS to use RBAC and Azure Active Directory manually.
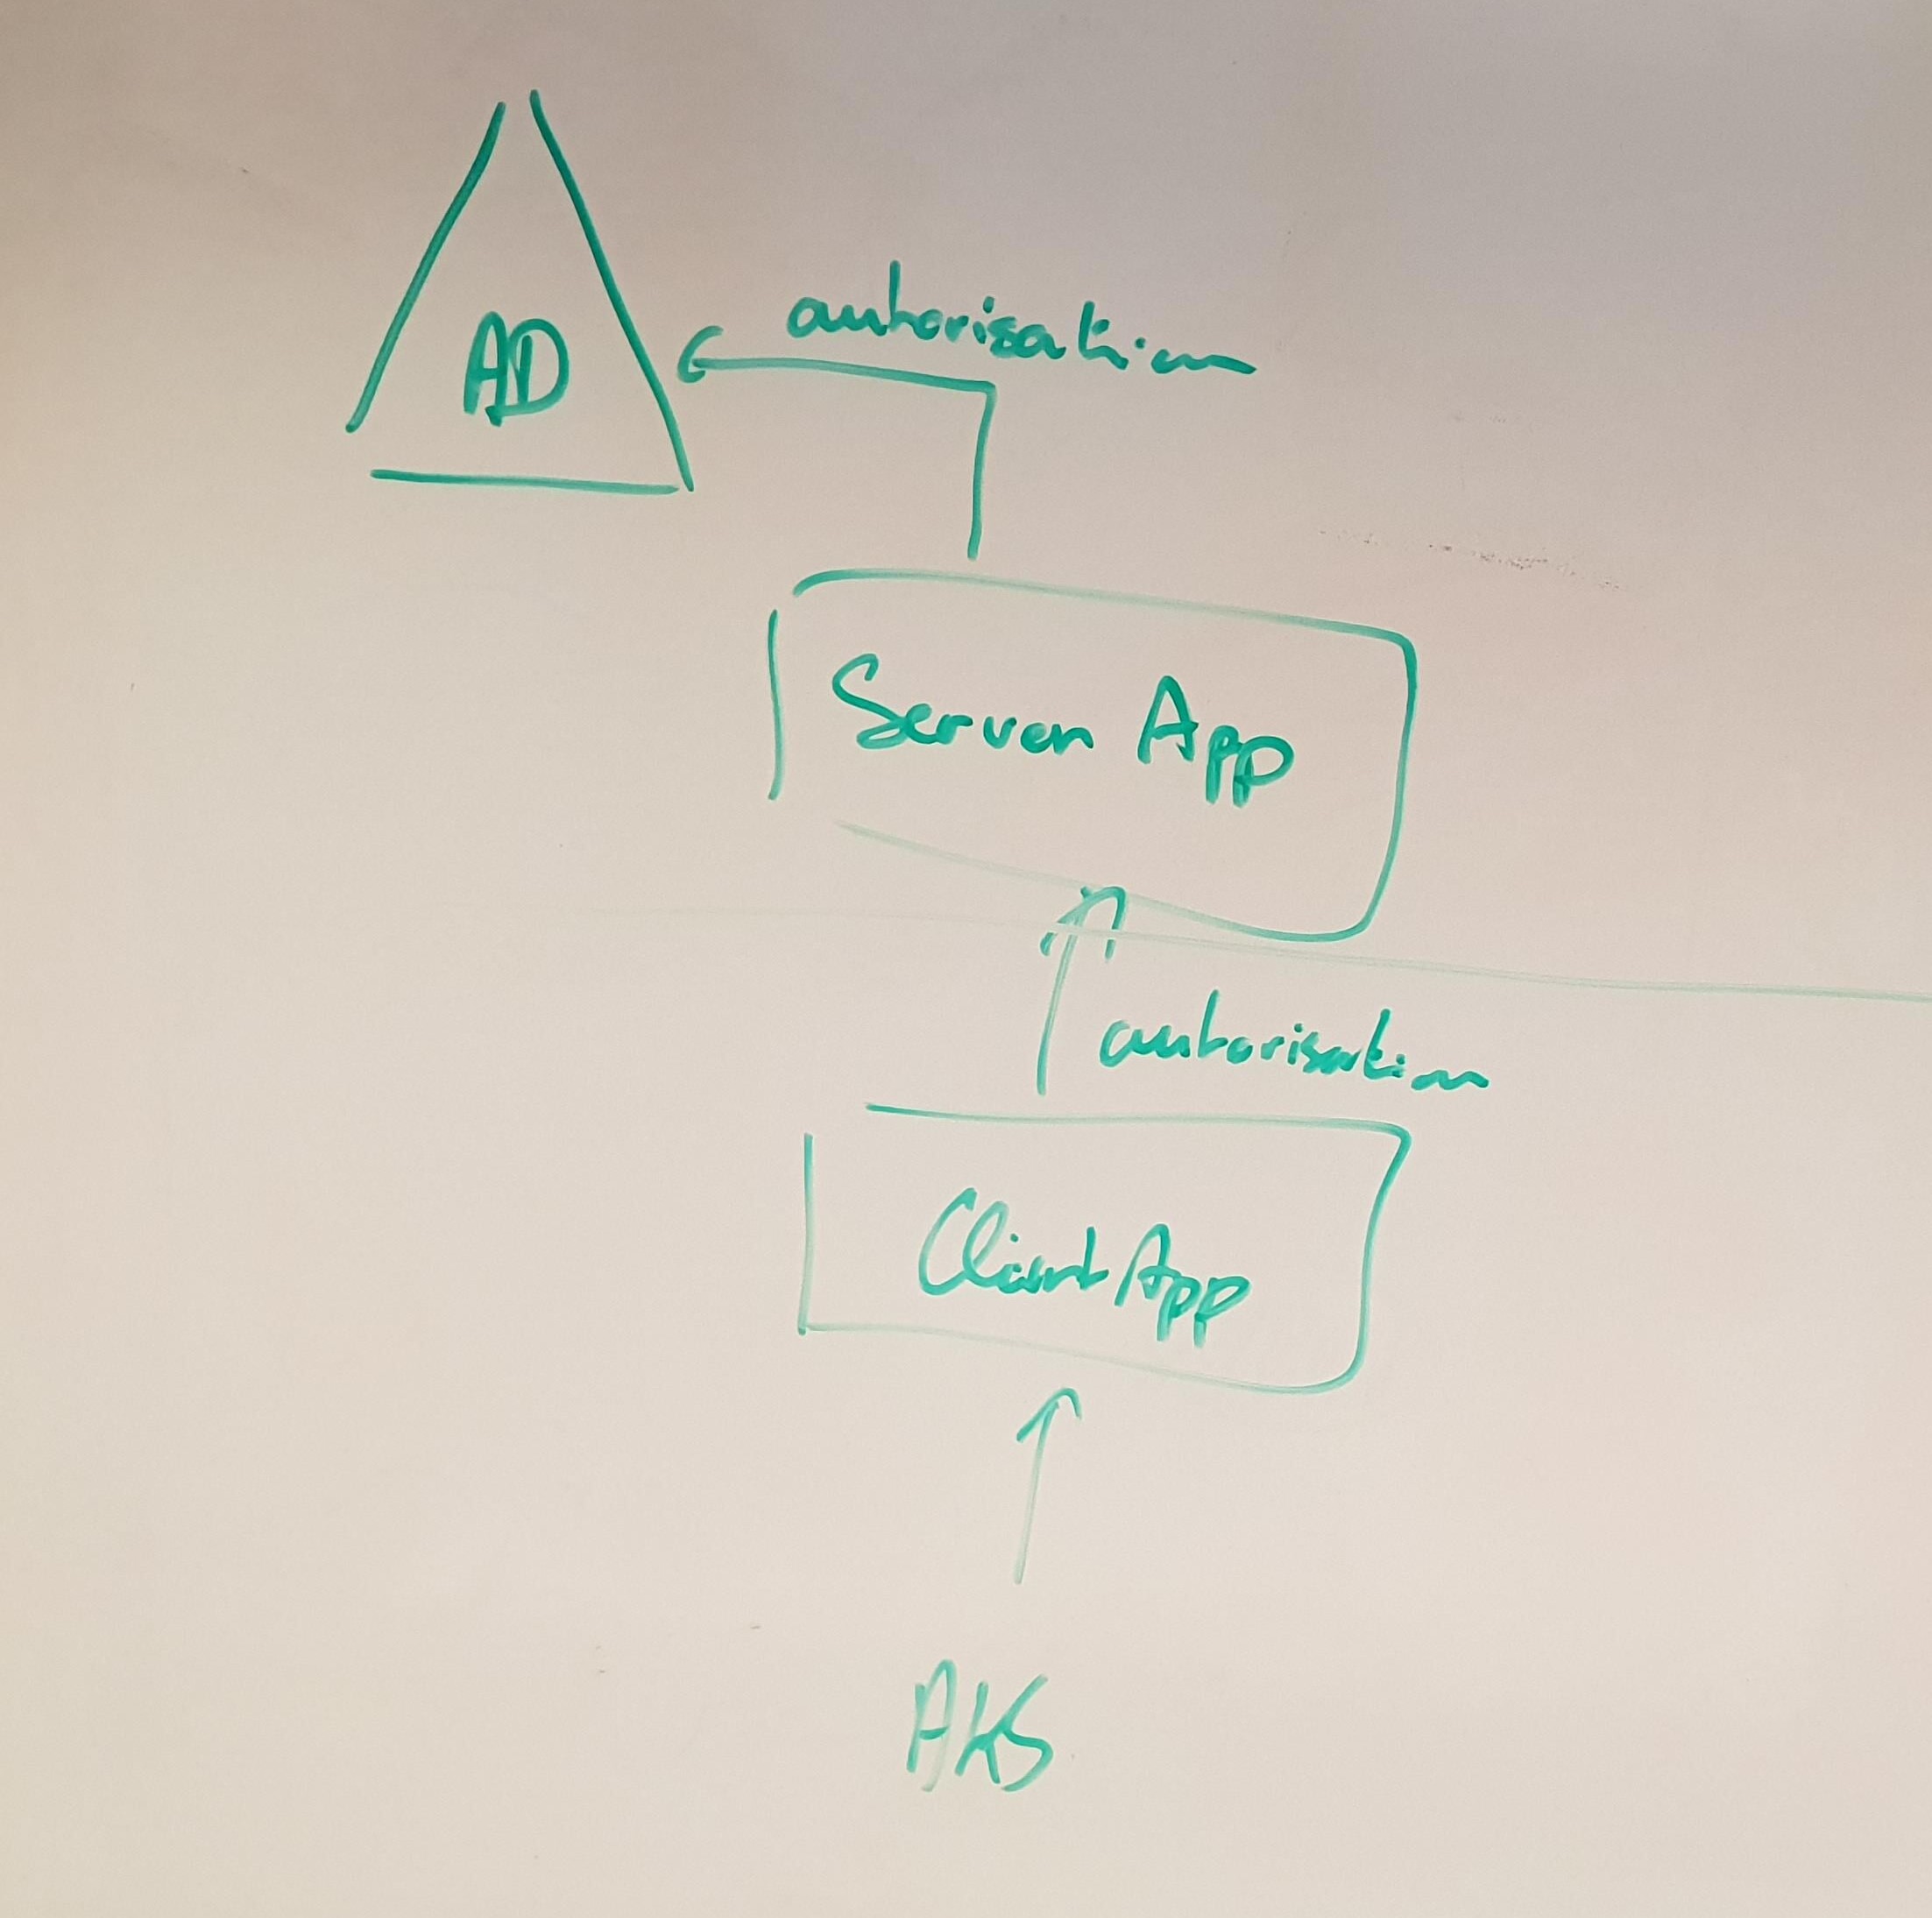
To enable Azure Active Directory autorization with Kubernetes, you need to create two applications:
- A server application, that will work with Azure Active Directory
- A client application, that will work with the server application
Multiple AKS clusters can use the same server application, but it’s recommended to have one client application per cluster.
Create the server application
It’s possible to scripts almost all the creation of the Active Directory server application, but you will need to go to the portal to grant the permissions manually after it has been created as it requires some Admin-restricted permissions at the application level.
Open the server application creation script and update the environment variables with the values you want to use:
export RBAC_AZURE_TENANT_ID="REPLACE_WITH_YOUR_TENANT_ID"
export RBAC_SERVER_APP_NAME="AKSAADServer2"
export RBAC_SERVER_APP_URL="http://aksaadserver2"
export RBAC_SERVER_APP_SECRET="$(cat /dev/urandom | tr -dc 'a-zA-Z0-9' | fold -w 32 | head -n 1)"
Then execute the script:
cd azure-ad
./create-azure-ad-server-app.sh
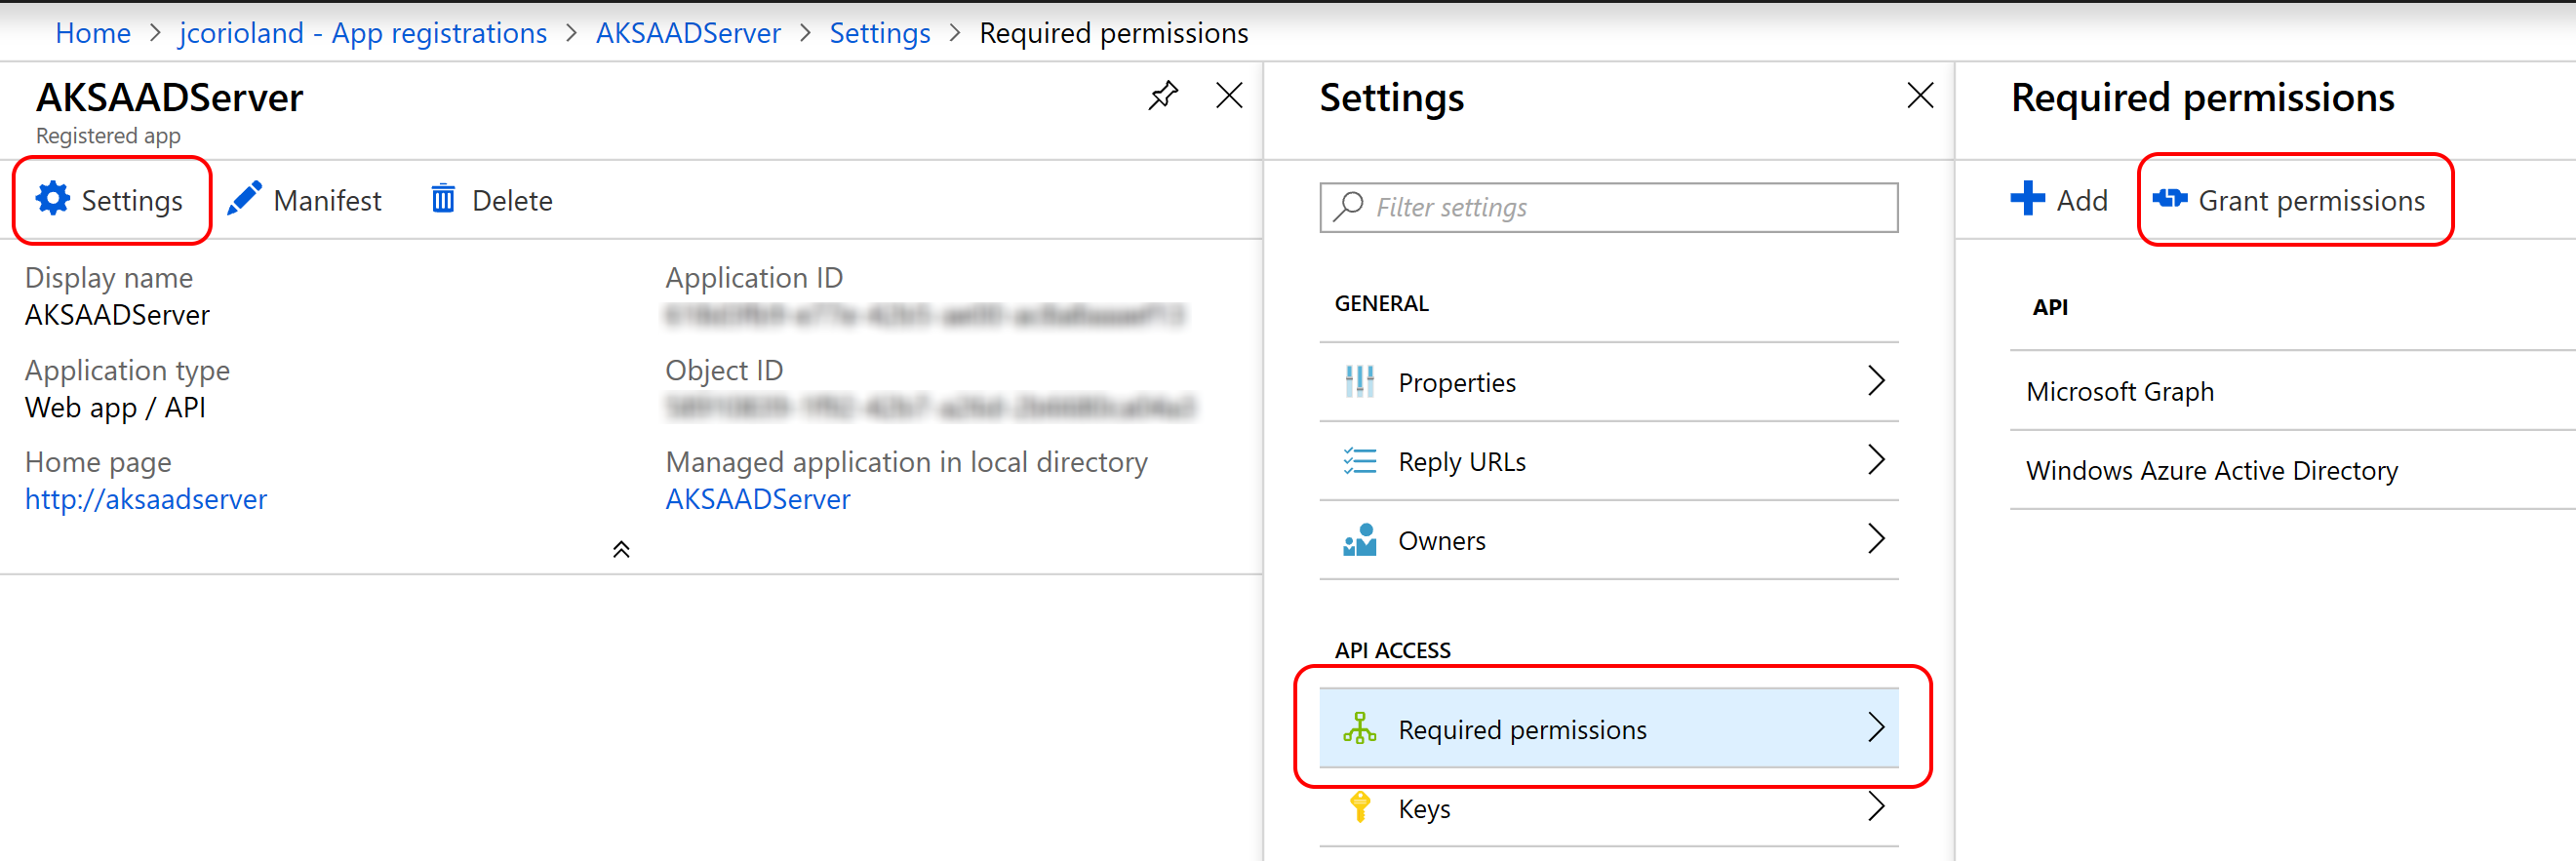
Once created, open the Azure Portal, and browse your application through Azure Active Directory > App registrations > View all applications > NAME_OF_YOUR_APP > Settings > Required Permissions
Click the Grant permissions button and accept to grant the permissions for the tenant:
Copy the export directive that have been generated by the scripts and past them into the client application creation script to replace the existing placeholders:
export RBAC_SERVER_APP_ID="COMPLETE_AFTER_SERVER_APP_CREATION"
export RBAC_SERVER_APP_OAUTH2PERMISSIONS_ID="COMPLETE_AFTER_SERVER_APP_CREATION"
export RBAC_SERVER_APP_SECRET="COMPLETE_AFTER_SERVER_APP_CREATION"
You can reuse the same server application for all your Azure Kubernetes Service cluster.
Create the client application
The creation of the client application is fully scripted. Make sure to have the right values for the environment variables export at the begining of the client application creation script and execute it:
cd azure-ad
./create-azure-ad-client-app.sh
Once completed, the script output environment variables export directive that you can copy for later deployment using Terraform.
Terraform deployment
Since v1.19 Azure RM Terraform provider supports AKS deployment using RBAC + Azure Active Directory.
The terraform folder of this repository contains everything you need to deploy the cluster.
First, you may want to edit the variables.tf file to fill the different variables with the right names / values for your environment.
Then, you need to export the following environment variables:
export TF_VAR_client_id=SERVICE_PRINCIPAL_CLIENT_ID
export TF_VAR_client_secret=SERVICE_PRINCIPAL_CLIENT_SECRET
# the following exports are in the output of the client application creation script
export TF_VAR_rbac_server_app_id=RBAC_SERVER_APP_ID
export TF_VAR_rbac_server_app_secret=RBAC_SERVER_APP_PASSWORD
export TF_VAR_rbac_client_app_id=RBAC_CLIENT_APP_ID
export TF_VAR_tenant_id=AZURE_TENANT_ID
Initialize Terraform
terraform init -backend-config="storage_account_name=YOUR_AZURE_STORAGE_ACCOUNT_NAME" \
    -backend-config="container_name=tfstate" \
    -backend-config="access_key=YOUR_STORAGE_ACCOUNT_KEY" \
    -backend-config="key=NAME_OF_YOUR_STATE_FILE.tfstate"
Create the Terraform plan
terraform plan -out "out.plan"
Apply the Terraform plan
terraform apply "out.plan"
Wait for the Azure Kubernetes Service cluster to be completed.
Configure Kubernetes RBAC
Now that the cluster is deployed and secured using RBAC and Azure Active Directory, you need to create Role/RoleBinding, ClusterRole/ClusterRoleBinding object using the Kubernetes API to give access to your Azure Active Directory user and groups.
In order to do that, you need to connect to the cluster. You can get an administrator Kubernetes configuration file using the Azure CLI:
az aks get credentials -n CLUSTER_NAME -g RESOURCE_GROUP_NAME --admin
The repository contains a simple ClusterRoleBinding object definition file that will make sure that the Azure Active Directory user [email protected] get cluster-admin role:
apiVersion: rbac.authorization.k8s.io/v1
kind: ClusterRoleBinding
metadata:
  name: aks-cluster-admins
roleRef:
  apiGroup: rbac.authorization.k8s.io
  kind: ClusterRole
  name: cluster-admin
subjects:
- apiGroup: rbac.authorization.k8s.io
  kind: User
  name: "[email protected]"
You can update this first cluster role binding and apply it using:
kubectl apply -f k8s-rbac/cluster-admin-rolebinding.yaml
You can also create RoleBinding/ClusterRoleBinding for Azure Active Directory group, as described here.
Connect to the cluster using RBAC and Azure AD
Once all you RBAC objects are defined in Kubernetes, you can get a Kubernetes configuration file that is not admin-enabled using the az aks get-credentials command without the --admin flag.
az aks get credentials -n CLUSTER_NAME -g RESOURCE_GROUP_NAME
When you are going to use kubectl you are going to be asked to use the Azure Device Login authentication first:
kubectl get nodes

To sign in, use a web browser to open the page https://microsoft.com/devicelogin and enter the code BUJHWDGNL to authenticate.
Hope this helps!