


Terraform on Microsoft Azure - Part 2: Basics
04 Sep 2019 in DevOps | Microsoft Azure | TerraformThis blog post is part of the series about using Terraform on Microsoft Azure. In this part, I will discuss about the basics of Terraform and how you can get started easily with it to deploy infrastructure to Azure.
Download and install Terraform
Terraform is based on a plugins architecture. That means that you need to download the core executable and install it on your machine and then, depending on the platforms/providers you are working with, it will download the right plugins for you. The installation is really simple: just unpack the binary you’ve downloaded and put it somewhere accessible from your PATH.
You can validate your installation by executing the command terraform --version:
PS C:\workspaces\hello-tf-azure> terraform --version
Terraform v0.12.7
Create a basic Terraform project
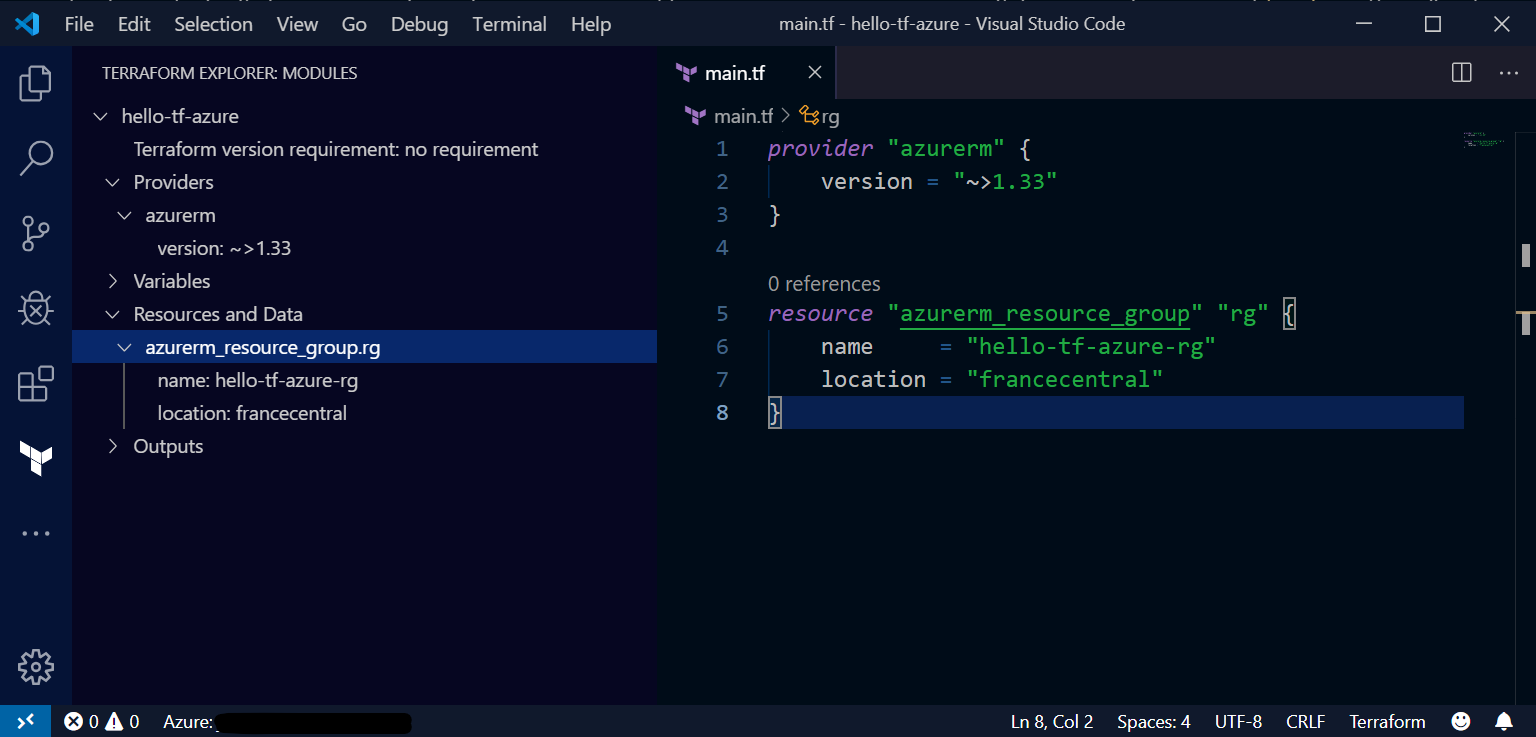
A Terraform project/context is specific to a directory. Create a directory and name it hello-tf-azure. Add a main.tf file in this directory, with the following content:
provider "azurerm" {
    version = "~>1.33"
}

resource "azurerm_resource_group" "rg" {
    name     = "hello-tf-azure-rg"
    location = "francecentral"
}
This file is really basic:
- the
providerdirective indicates that we want to use the version 1.33 of theazurermprovider, i.e. that we are going to use the Terraform Azure Resource Manager provider, one of the plugins available for Terraform that allows to deploy resources on Azure. It’s always important to specify the version of the provider you want to use, to avoid implicit version upgrade between runs. You can find more details about how to specify the version on this page. - the
resourcedirectory indicates that we are going to create a new resource, of typeazurerm_resource_groupwith two parametersnameandlocation. This will make sure Terraform creates a resource group namedhello-tf-azure-rgin the France Central Azure region.
Note: if you are a Visual Studio Code user, you can download the Azure Terraform and the Terraform extensions. Those two extensions will help to work with Terraform and get syntax highlighting and intellisense!
Your Terraform template is done! Let’s see how to deploy it to Microsoft Azure.
Terraform initialization
First, you need to initialize your project directory. This can be done by running the terraform init command into the directory.
PS C:\workspaces\hello-tf-azure> terraform init

Initializing the backend...

Initializing provider plugins...
- Checking for available provider plugins...
- Downloading plugin for provider "azurerm" (hashicorp/azurerm) 1.33.1...

Terraform has been successfully initialized!

You may now begin working with Terraform. Try running "terraform plan" to see
any changes that are required for your infrastructure. All Terraform commands
should now work.

If you ever set or change modules or backend configuration for Terraform,
rerun this command to reinitialize your working directory. If you forget, other
commands will detect it and remind you to do so if necessary.
The goal of this command is to download all the provider plugins that are required to deploy your template. In that case, it downloads the Azure Resource Manager Terraform provider release corresponding ot the version filter you’ve set in the provider directive.
Your project is now ready to be deployed to Microsoft Azure! Actually, almost ready.
Terraform and Microsoft Azure authentication
You need to deal with authentication first. When working with Terraform, you have several options to authenticate to Microsoft Azure:
- Azure CLI: Terraform will just use your Azure CLI credentials to work with Azure. That means that you need to have the Azure CLI installed and you must have done an
azure loginbefore working with Terraform. More information about this authentication method here. - Azure Managed Service Identity: Terraform can use a MSI that is available on the virtual machine that executes the deployment. More information about this authentication method here.
- Service Principal and Client Certificate: you can use a service principal with an assigned client certificate. More information about this authentication method here.
- Service Principal and CLient Secret: you can use a service principal and its client secret to authenticate. More information about this authentication method here
Note: When you are running Terraform deployment on your machine, for testing/development purpose, it’s easier to use the Azure CLI authentication. Because it requires interactive login, it’s not recommanded for automation. You will prefer to use service principal authentication, or better, a managed service identity. This will be covered later in this blog post series.
Terraform deployment
Ok, so you are logged in your Azure subscription. You can now deploy by using the terraform apply command:
PS C:\workspaces\junk\hello-tf-azure> terraform apply

An execution plan has been generated and is shown below.
Resource actions are indicated with the following symbols:
  + create

Terraform will perform the following actions:

  # azurerm_resource_group.rg will be created
  + resource "azurerm_resource_group" "rg" {
      + id       = (known after apply)
      + location = "francecentral"
      + name     = "hello-tf-azure-rg"
      + tags     = (known after apply)
    }

Plan: 1 to add, 0 to change, 0 to destroy.

Do you want to perform these actions?
  Terraform will perform the actions described above.
  Only 'yes' will be accepted to approve.

  Enter a value:
This command will connect to your Azure subscription to check what resources already exists and generate an execution plan. It outputs the actions that are about to be execute to your Azure account. In this case, it will create a resource group.
Type yes on the prompt and Enter. The deployment is starting…
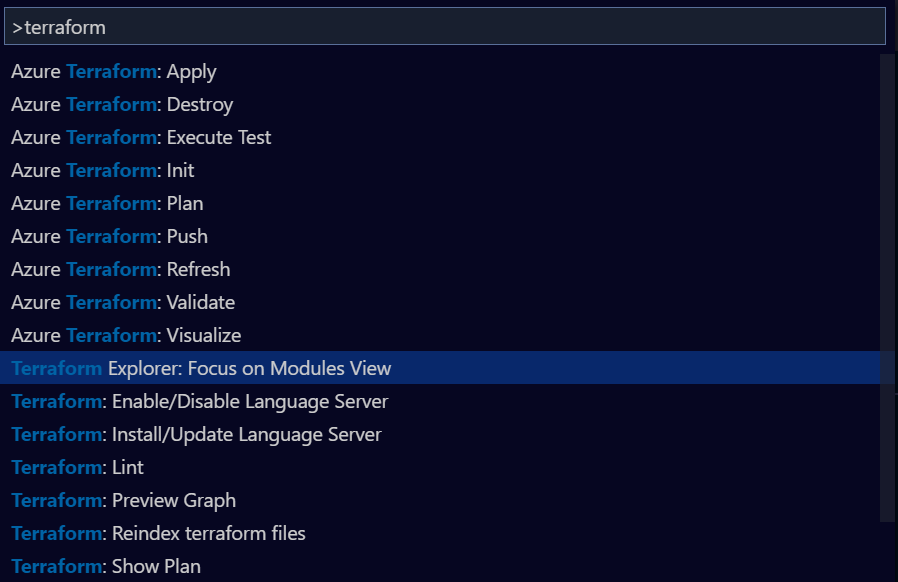
Note: while the deployment is pending, you can browse the Visual Studio Code command palette to check all the Terraform commands that are available with the extensions:
The deployment must be completed now:
azurerm_resource_group.rg: Creating...
azurerm_resource_group.rg: Creation complete after 2s [id=/subscriptions/SUBSCRIPTION_ID/resourceGroups/hello-tf-azure-rg]

Apply complete! Resources: 1 added, 0 changed, 0 destroyed.
If you look into your directory, a state file named terraform.tfstate has been generated. This file is important as it contains all the state information about what has been deployed to Azure:
{
  "version": 4,
  "terraform_version": "0.12.7",
  "serial": 1,
  "lineage": "9fe982b1-7d77-f5f6-940d-4add634605f4",
  "outputs": {},
  "resources": [
    {
      "mode": "managed",
      "type": "azurerm_resource_group",
      "name": "rg",
      "provider": "provider.azurerm",
      "instances": [
        {
          "schema_version": 0,
          "attributes": {
            "id": "/subscriptions/SUBSCRIPTION_ID/resourceGroups/hello-tf-azure-rg",
            "location": "francecentral",
            "name": "hello-tf-azure-rg",
            "tags": {}
          }
        }
      ]
    }
  ]
}
Note: the next post of this blog post series will discuss in details how to manage Terraform state and store it remotely to be shared between continuous deployment executions and/or your team members. You can also read more about it in the official Terraform documentation.
If you do another terraform apply in your directory, you will see that the execution plan has no action to execute (everything is already deployed):
PS C:\workspaces\hello-tf-azure> terraform apply
azurerm_resource_group.rg: Refreshing state... [id=/subscriptions/SUBSCRIPTION_ID/resourceGroups/hello-tf-azure-rg]

Apply complete! Resources: 0 added, 0 changed, 0 destroyed.
Work with execution plan
It is also possible to execute the terraform plan command before the terraform apply. The plan command generates an execution plan and allows to store it into a file. This file can then by used as a parameter of the apply command.
Let’s add another resource group definition into the Terraform template file:
provider "azurerm" {
    version = "~>1.33"
}

resource "azurerm_resource_group" "rg" {
    name     = "hello-tf-azure-rg"
    location = "francecentral"
}

resource "azurerm_resource_group" "rg2" {
    name     = "hello-tf-azure-2-rg"
    location = "francecentral"
}
And execute the terraform plan -out out.plan command like the following:
PS C:\workspaces\junk\hello-tf-azure> terraform plan -out out.plan
Refreshing Terraform state in-memory prior to plan...
The refreshed state will be used to calculate this plan, but will not be
persisted to local or remote state storage.

azurerm_resource_group.rg: Refreshing state... [id=/subscriptions/SUBSCRIPTION_ID/resourceGroups/hello-tf-azure-rg]

------------------------------------------------------------------------

An execution plan has been generated and is shown below.
Resource actions are indicated with the following symbols:
  + create

Terraform will perform the following actions:

  # azurerm_resource_group.rg2 will be created
  + resource "azurerm_resource_group" "rg2" {
      + id       = (known after apply)
      + location = "francecentral"
      + name     = "hello-tf-azure-2-rg"
      + tags     = (known after apply)
    }

Plan: 1 to add, 0 to change, 0 to destroy.

------------------------------------------------------------------------

This plan was saved to: out.plan

To perform exactly these actions, run the following command to apply:
    terraform apply "out.plan"
Terraform checks what is already existing and what actions need to be executed. In that case, only the second resource group needs to be created. The new execution plan has been saved into the out.plan file.
You can apply the plan by running the terraform apply "out.plan" command:
PS C:\workspaces\hello-tf-azure> terraform apply "out.plan"
azurerm_resource_group.rg2: Creating...
azurerm_resource_group.rg2: Creation complete after 1s [id=/subscriptions/SUBSCRIPTION_ID/resourceGroups/hello-tf-azure-2-rg]

Apply complete! Resources: 1 added, 0 changed, 0 destroyed.

The state of your infrastructure has been saved to the path
below. This state is required to modify and destroy your
infrastructure, so keep it safe. To inspect the complete state
use the `terraform show` command.

State path: terraform.tfstate
The second resource group has been created, and the local state file has been updated.
You can visualize the state by using the terraform show command in your directory:
PS C:\workspaces\hello-tf-azure> terraform show
# azurerm_resource_group.rg:
resource "azurerm_resource_group" "rg" {
    id       = "/subscriptions/SUBSCRIPTION_ID/resourceGroups/hello-tf-azure-rg"
    location = "francecentral"
    name     = "hello-tf-azure-rg"
    tags     = {}
}

# azurerm_resource_group.rg2:
resource "azurerm_resource_group" "rg2" {
    id       = "/subscriptions/SUBSCRIPTION_ID/resourceGroups/hello-tf-azure-2-rg"
    location = "francecentral"
    name     = "hello-tf-azure-2-rg"
    tags     = {}
}
Destroy infrastructure
Finally, you can delete everything by using the terraform destroy command:
PS C:\workspaces\junk\hello-tf-azure> terraform destroy
azurerm_resource_group.rg2: Refreshing state... [id=/subscriptions/SUBSCRIPTION_ID/resourceGroups/hello-tf-azure-2-rg]
azurerm_resource_group.rg: Refreshing state... [id=/subscriptions/SUBSCRIPTION_ID/resourceGroups/hello-tf-azure-rg]

An execution plan has been generated and is shown below.
Resource actions are indicated with the following symbols:
  - destroy

Terraform will perform the following actions:

  # azurerm_resource_group.rg will be destroyed
  - resource "azurerm_resource_group" "rg" {
      - id       = "/subscriptions/SUBSCRIPTION_ID/resourceGroups/hello-tf-azure-rg" -> null
      - location = "francecentral" -> null
      - name     = "hello-tf-azure-rg" -> null
      - tags     = {} -> null
    }

  # azurerm_resource_group.rg2 will be destroyed
  - resource "azurerm_resource_group" "rg2" {
      - id       = "/subscriptions/SUBSCRIPTION_ID/resourceGroups/hello-tf-azure-2-rg" -> null
      - location = "francecentral" -> null
      - name     = "hello-tf-azure-2-rg" -> null
      - tags     = {} -> null
    }

Plan: 0 to add, 0 to change, 2 to destroy.

Do you really want to destroy all resources?
  Terraform will destroy all your managed infrastructure, as shown above.
  There is no undo. Only 'yes' will be accepted to confirm.

  Enter a value:
Like for the apply command, it will generate an execution plan that show you all the actions that are about to be executed. In that case, destroying the two resource groups. Type yes and Enter to validate the plan and wait for the destroy operation to be completed.
azurerm_resource_group.rg: Destroying... [id=/subscriptions/SUBSCRIPTION_ID/resourceGroups/hello-tf-azure-rg]
azurerm_resource_group.rg2: Destroying... [id=/subscriptions/SUBSCRIPTION_ID/resourceGroups/hello-tf-azure-2-rg]
azurerm_resource_group.rg2: Still destroying... [id=/subscriptions/SUBSCRIPTION_ID/resourceGroups/hello-tf-azure-2-rg, 10s elapsed]
azurerm_resource_group.rg: Still destroying... [id=/subscriptions/SUBSCRIPTION_ID/resourceGroups/hello-tf-azure-rg, 10s elapsed]
azurerm_resource_group.rg2: Still destroying... [id=/subscriptions/SUBSCRIPTION_ID/resourceGroups/hello-tf-azure-2-rg, 20s elapsed]
azurerm_resource_group.rg: Still destroying... [id=/subscriptions/SUBSCRIPTION_ID/resourceGroups/hello-tf-azure-rg, 20s elapsed]
azurerm_resource_group.rg2: Still destroying... [id=/subscriptions/SUBSCRIPTION_ID/resourceGroups/hello-tf-azure-2-rg, 30s elapsed]
azurerm_resource_group.rg: Still destroying... [id=/subscriptions/SUBSCRIPTION_ID/resourceGroups/hello-tf-azure-rg, 30s elapsed]
azurerm_resource_group.rg: Still destroying... [id=/subscriptions/SUBSCRIPTION_ID/resourceGroups/hello-tf-azure-rg, 40s elapsed]
azurerm_resource_group.rg2: Still destroying... [id=/subscriptions/SUBSCRIPTION_ID/resourceGroups/hello-tf-azure-2-rg, 40s elapsed]
azurerm_resource_group.rg2: Destruction complete after 46s
azurerm_resource_group.rg: Destruction complete after 46s

Destroy complete! Resources: 2 destroyed.
Conclusion
You have now all the basics to get started with Terraform on Microsoft Azure. The next post of this series will be about Terraform state management.
Stay tuned!