


Terraform on Microsoft Azure - Part 3: Remote State Management
09 Sep 2019 in DevOps | Microsoft Azure | TerraformThis blog post is part of the series about using Terraform on Microsoft Azure. In this part, I will discuss about Terraform remote state management, i.e. how to save, share and lock the Terraform state between machines, pipelines, team members etc.
Why you must store Terraform state remotely
As discussed in the previous part of this series, Terraform needs to maintain state between the different deployments, essentially to improve the way it knows what actions need to be executed during a new deployment. Terraform state allows to know what is actually deployed on your target platform and stores some configuration relative to your deployments. This state must be considered as sensitive data, as it may contain sensitive information like connection strings, passwords etc…
By default, a state file is generated inside your Terraform project’s directory when the first terraform apply is done. This file will be updated each time the terraform apply command is ran. This is great, but not very reliable and safe to keep this file on your machine, for several reasons:
- you can loose your machine
- you can leave your company
- you may need to share the state between different machines (like build agents) or team members
I am sure there are plenty of other reasons to not keep the state of any Terraform deployment on a single machine. This is the reason why Terraform offers the option to store this state remotely.
Being able to save and share state information are not the only features provided by Terraform Remote State. It also provides resources locking, which is mandatory when you start to have multiple people or processes (like automated pipelines) doing deployments on the same infrastructure.
Help! I have lost my Terraform state!
Loosing the state can be really dramatic for your project, especially when you are dealing with massive infrastructure deployment. It’s really important to implement remote state management as soon as you are starting to use Terraform! In case you’ve lost it (I am sorry for you!) you can try to restore it by using the terraform import command on each resources that is supposed to be part of your Terraform project. Again, for massive deployments, it can be really painful, so the best option is to try to avoid being in that situation ;-)
For example, if you’ve lost the state from the previous article Terraform project, you can reimport the resource group name rg using its resource id in Azure, like the following:
julien@devbox-julien:/mnt/c/workspaces/hello-tf-azure$ terraform import azurerm_resource_group.rg /subscriptions/SUBSCRIPTION_ID/resourceGroups/hello-tf-azure-rg
azurerm_resource_group.rg: Importing from ID "/subscriptions/SUBSCRIPTION_ID/resourceGroups/hello-tf-azure-rg"...
azurerm_resource_group.rg: Import prepared!
  Prepared azurerm_resource_group for import
azurerm_resource_group.rg: Refreshing state... [id=/subscriptions/SUBSCRIPTION_ID/resourceGroups/hello-tf-azure-rg]

Import successful!

The resources that were imported are shown above. These resources are now in
your Terraform state and will henceforth be managed by Terraform.
Find more about the terraform import command here. Let’s go back to our remote state management, to make sure you’ll never lose it :-)
Remote State Management on Azure
There are two natural options to implement remote state management when targeting Microsoft Azure:
- you can use Terraform Cloud: I will not cover this topic, but your can find more information on this blog post from HashiCorp.
- you can use Azure Blob Storage, as detailled in the following.
Like for providers, Terraform remote state management is based on a plugins architecture: for each project you are working on, you can choose what is the remote state backend (provider) that you want to use.
Before being able to configure Terraform to store state remotely into Azure Storage, you need to deploy the infrastructure that will be used. The following script does everything for you:
#!/bin/bash

set -e

export LOCATION=westeurope
export COMMON_RESOURCE_GROUP_NAME=YOUR_RESOURCE_GROUP_NAME
export TF_STATE_STORAGE_ACCOUNT_NAME=YOUR_STORAGE_ACCOUNT_NAME
export TF_STATE_CONTAINER_NAME=YOUR_STORAGE_CONTAINER_NAME
export KEYVAULT_NAME=YOUR_KEYVAULT_NAME

# Create the resource group
echo "Creating $COMMON_RESOURCE_GROUP_NAME resource group..."
az group create -n $COMMON_RESOURCE_GROUP_NAME -l $LOCATION

echo "Resource group $COMMON_RESOURCE_GROUP_NAME created."

# Create the storage account
echo "Creating $TF_STATE_STORAGE_ACCOUNT_NAME storage account..."
az storage account create -g $COMMON_RESOURCE_GROUP_NAME -l $LOCATION \
  --name $TF_STATE_STORAGE_ACCOUNT_NAME \
  --sku Standard_LRS \
  --encryption-services blob

echo "Storage account $TF_STATE_STORAGE_ACCOUNT_NAME created."

# Retrieve the storage account key
echo "Retrieving storage account key..."
ACCOUNT_KEY=$(az storage account keys list --resource-group $COMMON_RESOURCE_GROUP_NAME --account-name $TF_STATE_STORAGE_ACCOUNT_NAME --query [0].value -o tsv)

echo "Storage account key retrieved."

# Create a storage container (for the Terraform State)
echo "Creating $TF_STATE_CONTAINER_NAME storage container..."
az storage container create --name $TF_STATE_CONTAINER_NAME --account-name $TF_STATE_STORAGE_ACCOUNT_NAME --account-key $ACCOUNT_KEY

echo "Storage container $TF_STATE_CONTAINER_NAME created."

# Create an Azure KeyVault
echo "Creating $KEYVAULT_NAME key vault..."
az keyvault create -g $COMMON_RESOURCE_GROUP_NAME -l $LOCATION --name $KEYVAULT_NAME

echo "Key vault $KEYVAULT_NAME created."

# Store the Terraform State Storage Key into KeyVault
echo "Store storage access key into key vault secret..."
az keyvault secret set --name tfstate-storage-key --value $ACCOUNT_KEY --vault-name $KEYVAULT_NAME

echo "Key vault secret created."

# Display information
echo "Azure Storage Account and KeyVault have been created."
echo "Run the following command to initialize Terraform to store its state into Azure Storage:"
echo "terraform init -backend-config=\"storage_account_name=$TF_STATE_STORAGE_ACCOUNT_NAME\" -backend-config=\"container_name=$TF_STATE_CONTAINER_NAME\" -backend-config=\"access_key=\$(az keyvault secret show --name tfstate-storage-key --vault-name $KEYVAULT_NAME --query value -o tsv)\" -backend-config=\"key=terraform-ref-architecture-tfstate\""
This script creates the following resources in Microsoft Azure:
- A storage account
- A blob storage container (that will store the state file)
- A key vault, that will be used to securely store the storage connection string and be used to generate the Terraform configuration command
Note: the last step is not required, but it’s better to store sensitive information like an Azure Storage connection string into Azure KeyVault, instead of having it into any scripts/configuration file… Especially when working with Terraform state that may contain sensitive data :)
Configure your Terraform project to use Azure Storage backend
If you execute the script, the output will contain the command line you need to execute to initialize Terraform and store its state remotely into the Azure Storage container that has been created:
terraform init -backend-config="storage_account_name=tfseries" \
    -backend-config="container_name=tfstate" \
    -backend-config="access_key=$(az keyvault secret show --name tfstate-storage-key --vault-name tfseries-state-kv --query value -o tsv)" \
    -backend-config="key=terraform-ref-architecture-tfstate"
It sets different keys for the backend configuration:
storage_account_name: the name of the Azure Storage accountcontainer_name: the name of the Azure Storage blob containeraccess_key: the storage access key (retrieved from the Azure Keyvault, in this example)key: the storage key to use, i.e. the name of the blob that will store Terraform state
Before executing the command, you need to update the Terraform configuration of your project to specify that you want to use the AzureRM backend (i.e. the Azure Storage account). You can do it by adding the following:
terraform {
  backend "azurerm" {}
}
Then you can execute the terraform init command line with all the backend configuration seen above.
PS C:\workspaces\hello-tf-azure> terraform init -backend-config="storage_account_name=tfseries" `
>>     -backend-config="container_name=tfstate" `
>>     -backend-config="access_key=$(az keyvault secret show --name tfstate-storage-key --vault-name tfseries-state-kv --query value -o tsv)" `
>>     -backend-config="key=terraform-ref-architecture-tfstate"

Initializing the backend...

Successfully configured the backend "azurerm"! Terraform will automatically
use this backend unless the backend configuration changes.

Initializing provider plugins...
- Checking for available provider plugins...
- Downloading plugin for provider "azurerm" (hashicorp/azurerm) 1.33.1...

Terraform has been successfully initialized!

You may now begin working with Terraform. Try running "terraform plan" to see
any changes that are required for your infrastructure. All Terraform commands
should now work.

If you ever set or change modules or backend configuration for Terraform,
rerun this command to reinitialize your working directory. If you forget, other
commands will detect it and remind you to do so if necessary.
Note: it is also possible to specify all backend configuration in the Terraform template, as documented on this page. I am not a big fan of this approach as it forces to have storage credentials in plain text into the file…
Congrats! Your Terraform project is configured to use Azure Storage as remote state backend :)
Test Azure Storage Remote State backend
The last step is to validate that everything is working correctly. You do not have to do anything specific to work with Azure Storage remote state backend now that the project directory has been configured. Just use the terraform apply command as you are used to. Instead of creating a local state file, Terraform will use the azurerm backend provider to upload the state into the configured Azure Storage.
PS C:\workspaces\junk\hello-tf-azure> terraform apply
Acquiring state lock. This may take a few moments...

An execution plan has been generated and is shown below.
Resource actions are indicated with the following symbols:
  + create

Terraform will perform the following actions:

  # azurerm_resource_group.rg will be created
  + resource "azurerm_resource_group" "rg" {
      + id       = (known after apply)
      + location = "francecentral"
      + name     = "hello-tf-azure-rg"
      + tags     = (known after apply)
    }

  # azurerm_resource_group.rg2 will be created
  + resource "azurerm_resource_group" "rg2" {
      + id       = (known after apply)
      + location = "francecentral"
      + name     = "hello-tf-azure-2-rg"
      + tags     = (known after apply)
    }

Plan: 2 to add, 0 to change, 0 to destroy.

Do you want to perform these actions?
  Terraform will perform the actions described above.
  Only 'yes' will be accepted to approve.

  Enter a value: yes

azurerm_resource_group.rg: Creating...
azurerm_resource_group.rg2: Creating...
azurerm_resource_group.rg: Creation complete after 1s [id=/subscriptions/SUBSCRIPTION_ID/resourceGroups/hello-tf-azure-rg]
azurerm_resource_group.rg2: Creation complete after 1s [id=/subscriptions/SUBSCRIPTION_ID/resourceGroups/hello-tf-azure-2-rg]

Apply complete! Resources: 2 added, 0 changed, 0 destroyed.
In the output, you can see that the first step is to acquire a lock on the state file, to make sure that there is no other running deployment in progress and avoid conflicts. Technically, when using the azurerm backend provider, this is achieved by acquiring a lease on the state blob.
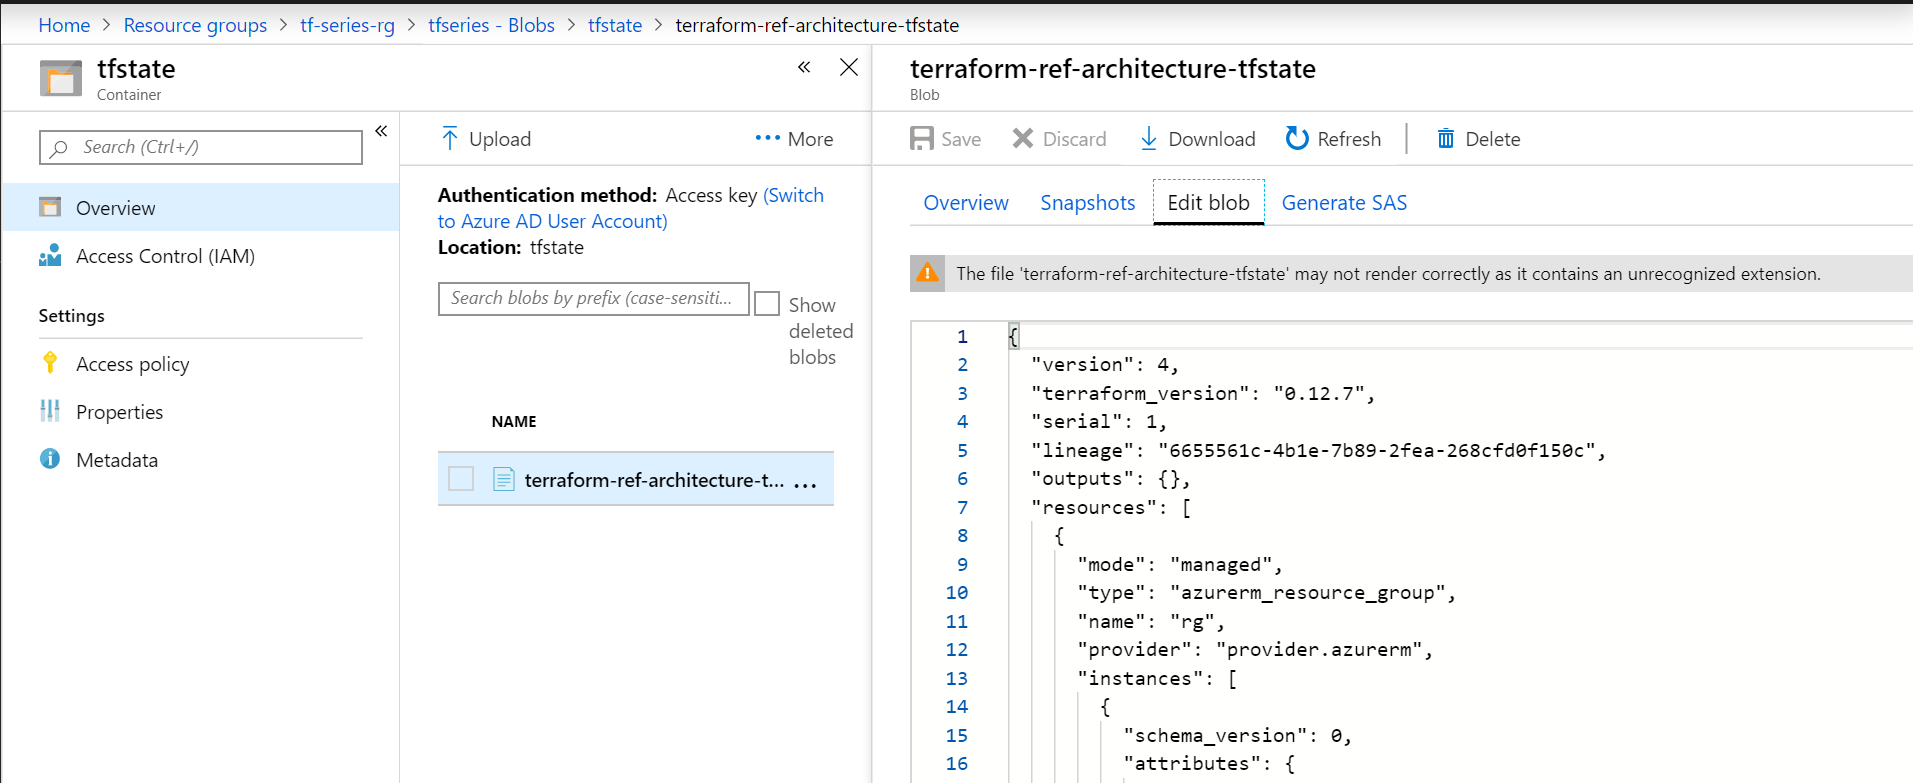
Once the state is locked, the deployment can be done, and all the new state information will be updated into the Azure blob:
Conclusion
In this blob post I explained why remote state management is really important with Terraform and how you can set it up with Azure Storage. In the next blog post of this series, I will discuss about how you can organize and factorize the different parts of your infrastructure using Terraform modules.
Stay tuned!