05 Apr 2014 in
Web Development
As you maybe heard this week at the day 1 keynote of the //Build 2014, Microsoft has announced that WinJS is now open source and available for web applications and not only Windows / Windows Phone apps ! It offers the possibility to develop WinJS apps for other devices than Windows devices. I think the opportunity is really cool 
WinJS sources are available on github and you can use it in your web apps now. It consists in a set of controls like ListView, FlipView, DatePicker, Hub… and more that can be used in simple web applications.
You may find a lot of samples at http://try.buildwinjs.com/
If you want more information about the WinJS roadmap, you’ll may be interested in watching this webcast from //Build 2014 :
Enjoy  !
!
Julien
read more
02 Apr 2014 in
General
Yesterday I have been renewed as Microsoft MVP ASP.NET / IIS for one more year ! I am really happy to be an MVP for the 5th year 

A big thank you to Microsoft for my renewal.
Currently, I work mainly on Microsoft web technologies and Microsoft Azure. I will continue to blog about these topics whenever I think something I did might be interesting for others. If you read French, you may also be interested in following my french blog : http://blogs.infinitesquare.com/b/beedoo !
Stay tuned 
Julien
read more
01 Apr 2014 in
ASP.NET MVC
|
ASP.NET Web API
During the Microsoft Techdays in Paris, I spoke with Simon Ferquel about the newest features that came with ASP.NET MVC 5 and Web API 2. A big part of our session was about OWIN that is (IMO) one of the most exciting feature that has been released.
Introduction to OWIN middleware programming
###
In short, OWIN (Open Web Interface for .Net) is a set of specifications that define how a web application runs on a web server. You can find more about these specifications on this page.
OWIN is based on middlewares to add behaviors to an application. For example, you can use OWIN middlewares to do external authentication with providers like Facebook, Google, Microsoft or Windows Azure Active Directory. You can also use OWIN middlewares as simple technical components of your application (logs, for example). Each OWIN middleware is responsible for its business.
Working with OWIN is very easy : first you have to write your OWIN middleware (or not, if you’re using an existing one provided by Microsoft or another third party).
An OWIN middleware is represented by a class that inherits from OwinMiddleware, as it is done for the LogsMiddleware bellow :
public class LogMiddleware : OwinMiddleware
{
public LogMiddleware(OwinMiddleware next) : base(next)
{

}

public async override Task Invoke(IOwinContext context)
{
Debug.WriteLine("Request begins: {0} {1}", context.Request.Method, context.Request.Uri);
await Next.Invoke(context);
Debug.WriteLine("Request ends : {0} {1}", context.Request.Method, context.Request.Uri);
}
}
As you can see, an OWIN middleware takes the next middleware to invoke as constructor parameter. You should next override the Invoke method that will do the middleware stuff and invoke the next middleware.
The sample above is very simple : it logs the begin and the end of each request that is made to the server. Once the middleware is ready, you only have to register it in your application and it will be available for all technologies in your app (mvc, web forms, web api, signalR…) : you write one middleware to rule them all ! 
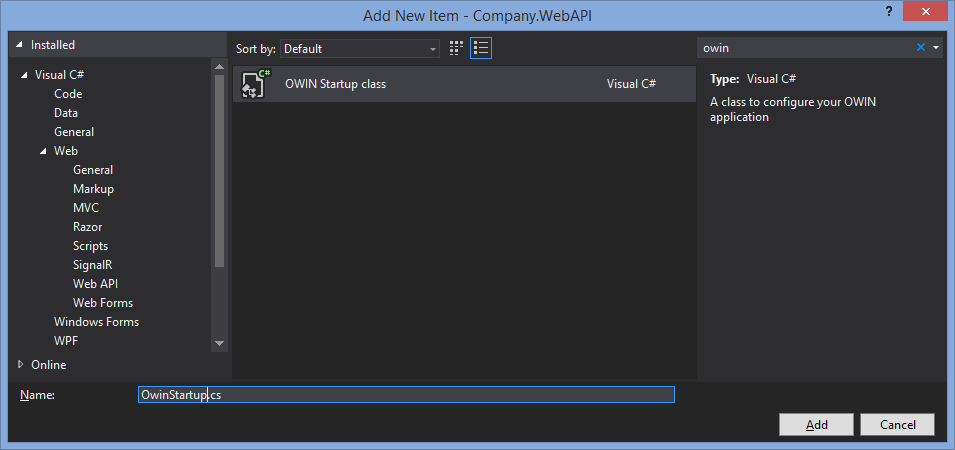
To register OWIN middlewares in your app, you have to create an OWIN Startup Class. You can use a Visual Studio template to create this class (or you can use the one that has been created at the project creation if it already exists) and all the structure of the class :
using Microsoft.Owin;
using Owin;

[assembly: OwinStartupAttribute(typeof(EbookManager.Web.Startup))]
namespace EbookManager.Web
{
public partial class Startup
{
public void Configuration(IAppBuilder app)
{

}
}
}
An OWIN startup class is very simple : it contains a method Configuration that returns void and takes an IAppBuilder instance as parameter. To make the class visible from OWIN, you should use the attribute OwinStartupAttribute at the assembly level and reference the type of the startup class. Now, you can register the log middleware and test your first OWIN middleware :
public void Configuration(IAppBuilder app)
{
app.Use(typeof(LogMiddleware));
}
And that’s all : your application will now use the log middleware via OWIN.
OWIN Self-Hosting
One of the other cool exciting feature of OWIN is the ability to self-host code like Web API or Signal-R :
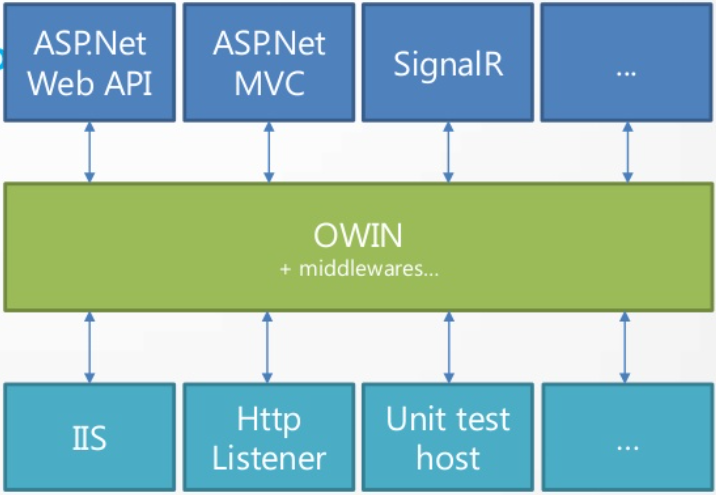
Microsoft provides different hosts that can run OWIN applications. The first one that everybody knows is IIS server that runs ASP.NET for many years. But Microsoft provides two other hosts : the http listener that allows to self-host a web api or a signal-r hub in a .NET application (for example a windows service or a console application) and the unit test host that allows to unit tests web api controllers without server-deployment.
Using the unit test host
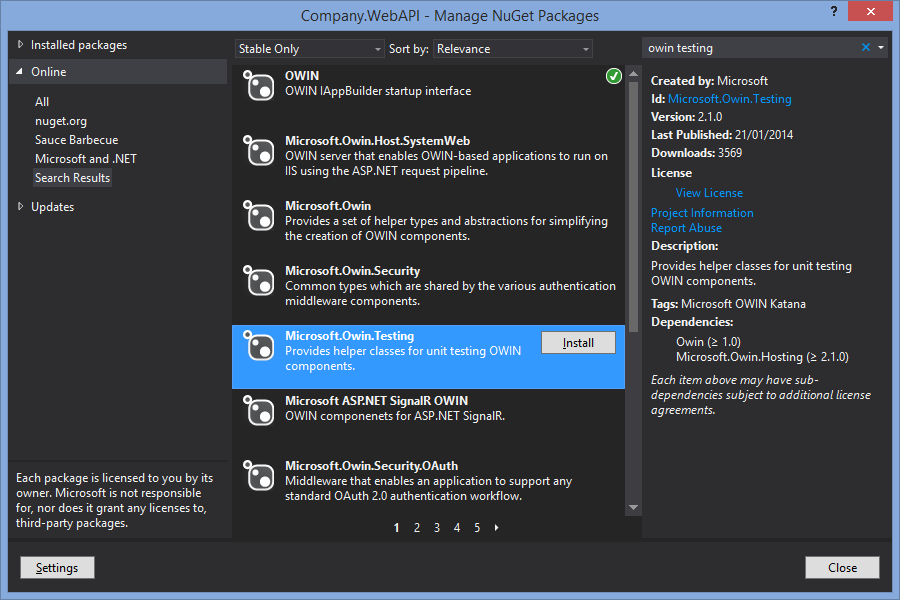
To work with the OWIN Unit Test host, you have to install the NuGet package Microsoft.Owin.Testing in your test project :
Once the package is installed, it is possible to create a test server that will host your web api without running IIS. To do that, you have to create an OWIN configuration class in the projet. This class is defined in the same way than an OWIN startup class except that you do not have to register it at the assembly level with the OwinStartupAttribute :
class OwinTestConf
{
public void Configuration(IAppBuilder app)
{
app.Use(typeof (LogMiddleware));
HttpConfiguration config = new HttpConfiguration();
config.Services.Replace(typeof(IAssembliesResolver), new TestWebApiResolver());
config.MapHttpAttributeRoutes();
app.UseWebApi(config);
}
}
Here, the configuration is done in the same way that you are use to configure an api written with Web API 2. The TestWebApiResolver is an assembly resolver that allows Web API to resolve controllers that are defined in another assembly than the one that defines unit tests.
Now, it is possible to create a test server based on the OWIN configuration in your unit test and use it like any Web API, for example with an HttpClient :
using (var server = TestServer.Create<OwinTestConf>())
{
using (var client = new HttpClient(server.Handler))
{
var response = await client.GetAsync("http://testserver/api/values");
var result = await response.Content.ReadAsAsync<List<string>>();
Assert.IsTrue(result.Any());
}
}
As you can see in the sample bellow, the HttpClient takes an custom handler that is provided by the OWIN test server. This is this step that allows us to bypass the use of the http protocol and that allows the tests to run without IIS.
Conclusion
I think that the ability to self-host a Web API in a test server to make unit test is a very cool feature because it really simplifies the process.
In my next post, I’ll discuss about testing a Web API that uses OAuth with OWIN.
If you’re interested in reading source code, you’ll find samples of OWIN usages in this project on github (this is the sample application we use at Microsoft Techdays).
Enjoy
read more
28 Jan 2014 in
DevOps
|
Windows 8
Introduction
Few months ago Microsoft announced the release of Visual Studio Online (VSO). One of the new feature that comes with VSO is Application Insights. It allows to monitor the performances of your applications and to find out what your users are doing the most or the less in your app. This kind of information may be very useful to optimize users’ experience in your app or propose new feature, based on behavior analysis.
Declare an application in the Visual Studio Online dashboard
Before using Application Insights, you have to declare the application in your dashboard on the VSO website. Go to your dashboard and click the item Try Application Insights :
In the Add application section, follow the wizard to declare a Windows Store app
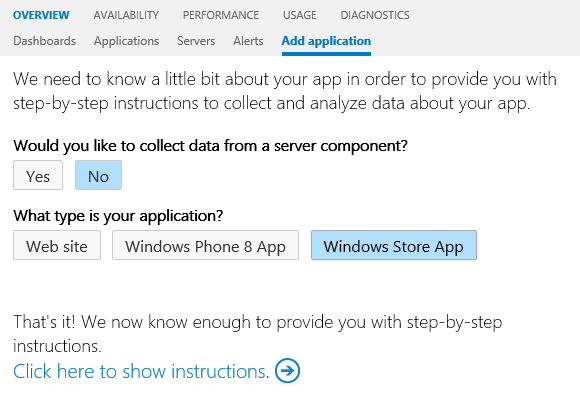
Name your application an copy the generated ID.
You are now ready to use application insights in your app.
###
How do I set up Application Insights in my project ?
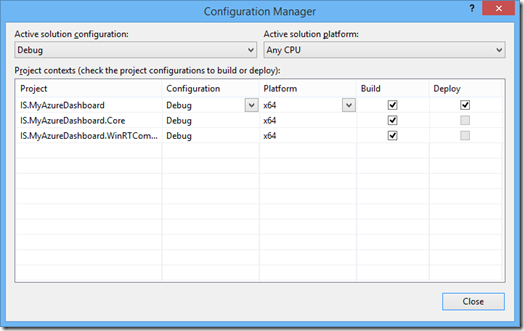
Setting up Application Insights in a Windows Store application is very easy. First, you should change the build configuration of your application and choose between x64, x86 and ARM. Any CPU is not supported because application insights is distributed as a winmd native component.
Once you have changed the build configuration of your projet, you can search for a Nuget package named Application Insights Telemetry SDK for Windows Store Apps :
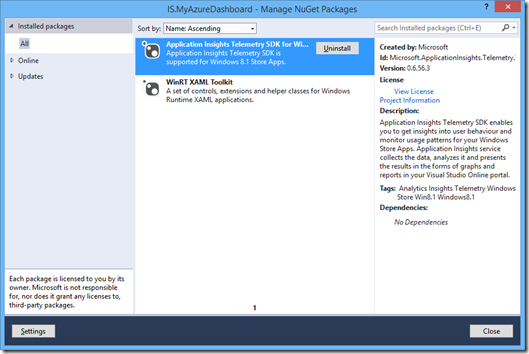
Do not waste time to look for the reference in your project after you have installed the package, it will be visible only after Visual Studio has been restarted (don’t ask why, it was the case for me…  ).
).
Build the solution and check you have no error in the console.
###
Using the Application Insights SDK in your application
The API is really easy to use. In the namespace Microsoft.ApplicationInsights.Telemetry.WindowsStore, you will find a class ClientAnalyticsSession that exposes a property Default. There are three interesting methods on this object :
- Start : takes the id of your application insights app and starts the analytics session
- LogEvent : logs a given event in your application (users behavior, most of the time)
- LogPageView : logs a page view
Now, you can implement your own tag plan in your app. You just have to call the Start method when your application launches and it’s ok !
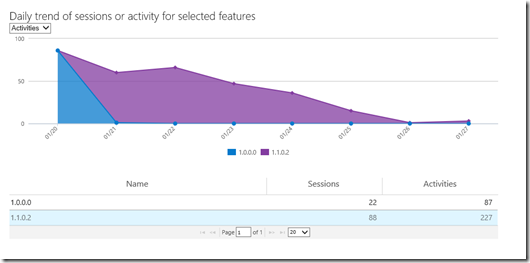
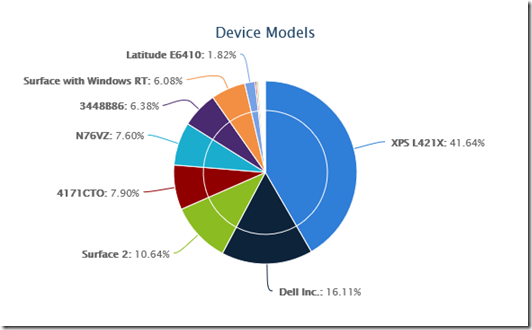
Application Insights allows to get some performance information about your application, but also monitor usage patterns in the application. For example, you can know what are the versions most used by your users :
You can also check the different resolutions or hardware of your users :
Or the languages :

And of course the detail of each event that occurs in the application and that you have triggered through the API :

Conclusion
As you can see, it is really easy to use Application Insights in a Windows Store application and the dashboard on the VSO website is very cool and very useful to read all the information about your application.
So do not hesitate anymore, use it !
Hope this helps !
Julien 
read more
06 Sep 2013 in
ASP.NET Web API
|
Microsoft Azure
Few months ago I blogged about how to use ASP.NET Web API to generate a shared access signature to upload a file from Windows Phone to the Windows Azure blob storage. It is also possible to use a Web API to return a shared access key that allows a client to download a blob, directly from the storage.
Today I will discuss on another scenario : the ability to stream a blob through a Web API, without returning a shared access key to the user. It can be really useful when you have to serve a file to a client without giving the shared access key that may be use until it expires (for one shot download, for example).
First, you have to get a reference to the blob to stream against the blob storage :
public async Task<HttpResponseMessage> Get(string blobId)
{
//security checks (for example)
if (!User.Identity.IsAuthenticated || !User.IsInRole("Premium"))
return Request.CreateErrorResponse(HttpStatusCode.Unauthorized, "unauthorized");

//call your service to get the blob information
var blobService = new BlobInformationService();
var blobInfo = blobService.GetBlobInfoById(blobId);

if (blobInfo == null)
return Request.CreateErrorResponse(HttpStatusCode.NotFound, "not found");

//create the storage credentials
var storageCredentials = new StorageCredentials(blobInfo.StorageAccountName, blobInfo.StorageAccountKey);

//create the cloud storage account
var cloudStorageAccount = new CloudStorageAccount(storageCredentials, true);

//create the cloud blob client
var cloudBlobClient = cloudStorageAccount.CreateCloudBlobClient();

//get the cloud blob reference
var cloudBlob = await cloudBlobClient.GetBlobReferenceFromServerAsync(new Uri(blobInfo.BlobUrl));
var cloudBlobExists = await cloudBlob.ExistsAsync();

if (!cloudBlobExists)
return Request.CreateErrorResponse(HttpStatusCode.NotFound, "not found");

//next step
}
Now that you have a valid blob reference, you can stream it ! To do that, you have to create your own instance of HttpResponseMessage and not use the CreateResponse method of the Request that uses the content negotiation to serialize the output. This http response message uses an instance of StreamContent as content.
The StreamContent accept a stream as constructor parameter. To get a valid stream on the cloud blob reference, you have to call the OpenReadAsync method on it.
To allow the browsers to display all the download’s information to the user (file name, file size, download progress…) you have to set the following headers :
-
ContentType : the file type
-
ContentLength : the length of the file
-
ContentDisposition : the file is an attachment, the file name, the size…
HttpResponseMessage message = new HttpResponseMessage(HttpStatusCode.OK);
Stream blobStream = await cloudBlob.OpenReadAsync();

message.Content = new StreamContent(blobStream);
message.Content.Headers.ContentLength = cloudBlob.Properties.Length;
message.Content.Headers.ContentType = new System.Net.Http.Headers.MediaTypeHeaderValue(cloudBlob.Properties.ContentType);
message.Content.Headers.ContentDisposition = new System.Net.Http.Headers.ContentDispositionHeaderValue("attachment")
{
FileName = blobInfo.FileName,
Size = cloudBlob.Properties.Length
};

return message;
Et voilà ! Now you can stream blobs via a Web API instead of sharing access key with any client.
Hope this helps.
Julien 
read more