03 May 2015 in
Microsoft Azure
La stratégie de Microsoft est claire depuis un petit moment : « mobile first, cloud first », c’est-à-dire un accès permanant à nos données, à demeure comme en mobilité, et sur n’importe quel périphérique (du Raspberry PI au Windows Phone, en passant par le PC, la XBOX), grâce à Windows 10 !
Evidemment, pour permettre cette mobilité, il faut un backend qui soit capable de stocker les données, mais aussi d’héberger des applications, des APIs, des services (…) afin de les rendre accessibles partout et tout le temps : c’est là qu’intervient Microsoft Azure !
 Il était donc assez logique qu’Azure occupe une place très importante lors de cette nouvelle édition de //Build ! Beaucoup d’annonces ont été faites, notamment lors de la keynote du premier jour. La suite sur .
A+
Julien
read more
20 Nov 2014 in
Microsoft Azure
As you maybe already know, Azure Media Services (AMS) has a feature called dynamic packaging that enables to stream a multi-bitrate asset as Smooth Streaming, HLS or MPEG-Dash dynamically, without storing an asset for each package format. Recently Microsoft added a new feature called dynamic content protection that allows to protect a content dynamically using AES or PlayReady DRM. In this post, I am going to explain how to enable PlayReady encryption, publish the asset and play it with the Silverlight player that has been updated by the AMS team to support PlayReady.
I wrote this post using the lot of samples provided on GitHub by the Azure Media Services team (thanks to them!) and the code of the on GitHub by the Azure Media Services team, so it may have some code that I took directly from these samples 
All the code of this blog post is available on my GitHub.
Overview of dynamic content protection
The feature is currently in preview on Microsoft Azure, so you have to enable it for your subscription if you want to use it. To do that, go to http://azure.microsoft.com/en-us/services/preview/ and search for Content Protection. Then click the Try it button and follow the steps to enable the feature :
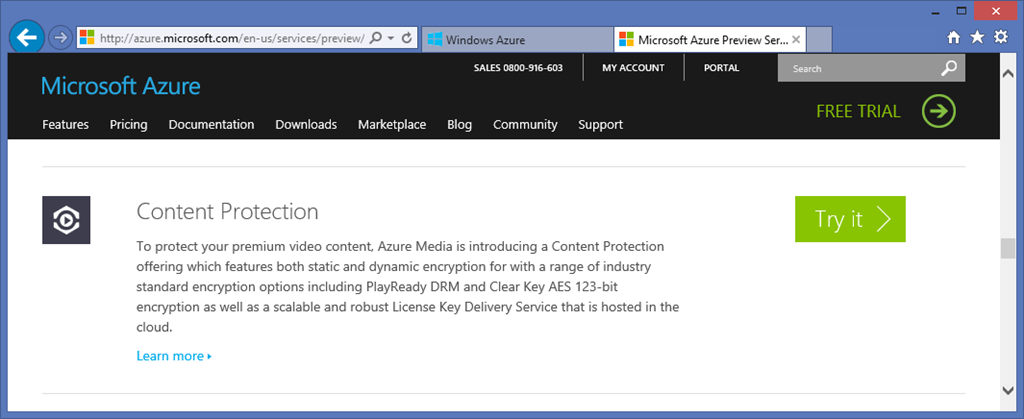
Once done, you are ready to play with PlayReady
There are two way to work with PlayReady in AMS. The first one is to use an external PlayReady license server to deliver the license (maybe you already have one for your services, so you can keep using it!). The second one is to use the license server that is hosted on Azure Media Services and protect the access to the service via a secure token service (like Azure Access Control or any other STS that can deliver SWT tokens). I am going to present the second way in this post.
The workflow to enable dynamic protection on a media asset is the following :
- Upload your asset in the Azure BLOB storage - Encode the asset in a multi-bitrate file to use dynamic packaging - Generate content keys and content delivery policy on the asset and configure PlayReady - Create a locator to be able to stream the asset dynamically
### Configure your media service in the Azure portal
Before starting to work with PlayReady, you need to configure your media service to be able to work with the STS that will deliver tokens. If you want to use ACS you can follow this post. In this article I will use a simple class to deliver tokens in my application.
Go on http://manage.windowsazure.com and select your media service. Go to the CONTENT PROTECTION tab. In the middle of the page you should see the PlayReady configuration :
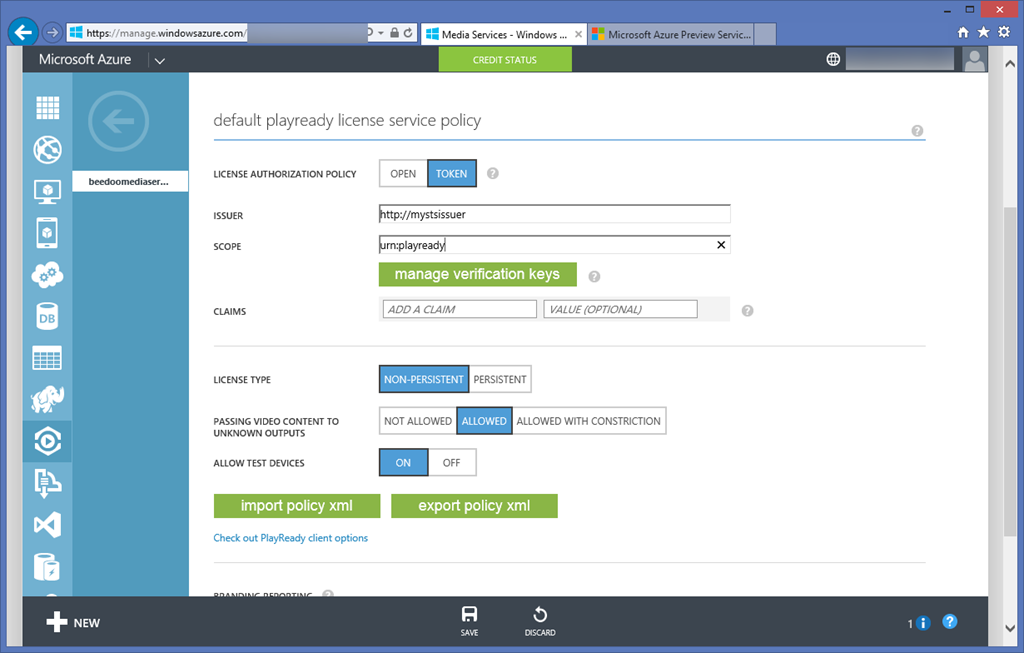
For the license authorization policy, choose Token. This option tells Azure Media Services that it should validate a bearer token when the client call the PlayReady license server.
The issuer represents the name or URI of the STS that will generates the token, and the scope (or audience) represents the scope that is given to the token when it is issued.
Click on the manage verification keys button. In the primary verification key field put the key that will be used by the STS to sign the token :
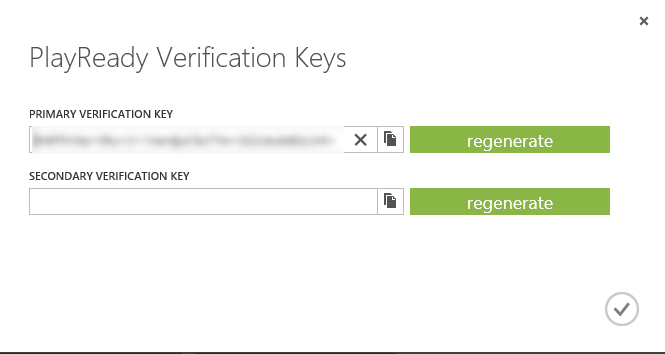
Eventually you can add a secondary validation key in case of the first one get compromised.
All these information will make Media Services able to validate the token that your player will pass in header when calling the PlayReady license through the license server.
Your media service is ready to work with PlayReady.
Deliver Simple Web Token (SWT)
As they are named, SWT are really simple token that are easy to exchange on the http protocol. They should contains at least :
- An issuer - An audience (scope) - An expiration date - A HMAC of all the parameters to ensure the token has not been compromised
If needed you can also pass a list of claims to the token.
All these parameters are URL encoded and represented in a simple query string : Issuer=your_issuer&Audience=your_audience etc…
The following class is a sample of Simple Web Token implementation :
/// <summary>
/// Represents a simple web token
/// </summary>
public class SimpleWebToken
{
private static readonly DateTime epochStart =
new DateTime(1970, 01, 01, 0, 0, 0, 0, DateTimeKind.Utc);

private NameValueCollection claimsCollection;
private byte[] signingKey = null;

/// <summary>
/// Initializes a new instance of the <see cref="SimpleWebToken"/> class.
/// </summary>
/// <param name="base64Key">The base64 key used to sign the token.</param>
/// <param name="ttl">The time to live.</param>
public SimpleWebToken(string base64Key, TimeSpan ttl)
{
TimeSpan ts = DateTime.UtcNow - epochStart + ttl;
this.ExpiresOn = Convert.ToUInt64(ts.TotalSeconds);
this.claimsCollection = new NameValueCollection();

var securityKey = new InMemorySymmetricSecurityKey(Convert.FromBase64String(base64Key));
signingKey = securityKey.GetSymmetricKey();
}

/// <summary>
/// Gets or sets the issuer.
/// </summary>
public string Issuer { get; set; }

/// <summary>
/// Gets or sets the audience.
/// </summary>
public string Audience { get; set; }

/// <summary>
/// Gets or sets the signature.
/// </summary>
public byte[] Signature { get; set; }

/// <summary>
/// Gets the expires on.
/// </summary>
public ulong ExpiresOn { get; private set; }

/// <summary>
/// Gets the claims.
/// </summary>
/// <value>
/// The claims.
/// </value>
public IList<Claim> Claims
{
get
{
return this.claimsCollection.AllKeys
.SelectMany(key =>
this.claimsCollection[key].Split(',')
.Select(value => new Claim(key, value)))
.ToList();
}
}

/// <summary>
/// Adds the claim.
/// </summary>
/// <param name="name">The name.</param>
/// <param name="value">The value.</param>
public void AddClaim(string name, string value)
{
this.claimsCollection.Add(name, value);
}

/// <summary>
/// Returns a <see cref="System.String" /> that represents this instance.
/// </summary>
/// <returns>
/// A <see cref="System.String" /> that represents this instance.
/// </returns>
public override string ToString()
{
StringBuilder content = new StringBuilder();

content.Append("Issuer=").Append(this.Issuer);

foreach (string key in this.claimsCollection.AllKeys)
{
content.Append('&').Append(key)
.Append('=').Append(this.claimsCollection[key]);
}

content.Append("&ExpiresOn=").Append(this.ExpiresOn);

if (!string.IsNullOrWhiteSpace(this.Audience))
{
content.Append("&Audience=").Append(this.Audience);
}

using (HMACSHA256 hmac = new HMACSHA256(signingKey))
{
byte[] signatureBytes = hmac.ComputeHash(
Encoding.ASCII.GetBytes(content.ToString()));

string signature = HttpUtility.UrlEncode(
Convert.ToBase64String(signatureBytes));

content.Append("&HMACSHA256=").Append(signature);
}

return content.ToString();
}
}
In our case, we will use the same issuer, audience and signing key than defined in the Azure Media Services portal.
It’s now really easy to issue a SWT using these information :
Uri issuerName = new Uri(ConfigurationManager.AppSettings["IssuerName"]);
Uri scope = new Uri(ConfigurationManager.AppSettings["Scope"]);
byte[] signingKey = Convert.FromBase64String(ConfigurationManager.AppSettings["SigningKey"]);

var swt = new SimpleWebToken(ConfigurationManager.AppSettings["SigningKey"], TimeSpan.FromMinutes(10));
swt.Audience = scope.ToString();
swt.Issuer = issuerName.ToString();

string token = swt.ToString();
Upload and encode the asset
In this part you will see how to upload an asset in the Azure BLOB storage and launch an encoding job to generate a multi-bitrate asset. First you have to add the media services NuGet package to your solution :
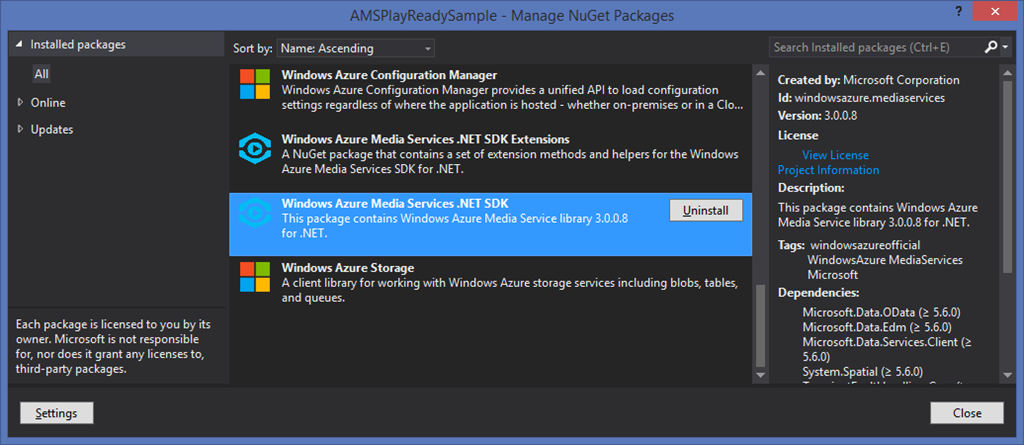
Be sure to also add the SDK Extensions package that give a set of really cool extensions methods for the media services SDK !
Creating a media services asset from a file is now really simple using the CreateFromFile extension methods on the assets collection :
string mediaServiceName = ConfigurationManager.AppSettings["MediaServiceName"];
string mediaServiceKey = ConfigurationManager.AppSettings["MediaServiceKey"];

var context = new CloudMediaContext(mediaServiceName, mediaServiceKey);

var asset = context.Assets.CreateFromFile(videoFilePath, AssetCreationOptions.None, (sender, progressChanged) =>
{
Console.WriteLine("{0} of {1} bytes uploaded", progressChanged.BytesUploaded, progressChanged.TotalBytes);
});
Once the asset as been uploaded, you can create a job that contains the encoding task :
IJob job = context.Jobs.CreateWithSingleTask(
MediaProcessorNames.AzureMediaEncoder,
MediaEncoderTaskPresetStrings.H264AdaptiveBitrateMP4Set720p,
asset,
"Adaptive Bitrate MP4",
AssetCreationOptions.None);

job.Submit();
job = job.StartExecutionProgressTask(j =>
{
Console.WriteLine("Job state : {0}", j.State);
Console.WriteLine("Job progress: {0:0.##}%", j.GetOverallProgress());
}, CancellationToken.None).Result;
If you want more explanations about these extensions for media services, you can follow this post.
Once the job is done, an output asset is available on it. This asset represents the multi-bitrate file that has been encoded. You can now generates all the stuff needed to enable PlayReady.
First you have to create a Content Key based on the CommonEncryption type :
private static async Task<IContentKey> CreateCommonTypeContentKeyAsync(IAsset asset, CloudMediaContext _context)
{
// Create envelope encryption content key
Guid keyId = Guid.NewGuid();
byte[] contentKey = GetRandomBuffer(16);

IContentKey key = await _context.ContentKeys.CreateAsync(
keyId,
contentKey,
"ContentKey CENC",
ContentKeyType.CommonEncryption);

// Associate the key with the asset.
asset.ContentKeys.Add(key);

return key;
}

private static byte[] GetRandomBuffer(int size)
{
byte[] randomBytes = new byte[size];
using (RNGCryptoServiceProvider rng = new RNGCryptoServiceProvider())
{
rng.GetBytes(randomBytes);
}

return randomBytes;
}
Next you have to generate the token restrictions to associate the issuer, the audience and the signing key of your STS with the content key :
private static List<ContentKeyAuthorizationPolicyRestriction> GetTokenRestrictions(string name, Uri issuer, Uri scope, byte[] signingKey)
{
TokenRestrictionTemplate tokenTemplate = new TokenRestrictionTemplate();
tokenTemplate.Issuer = issuer;
tokenTemplate.Audience = scope;
tokenTemplate.PrimaryVerificationKey = new SymmetricVerificationKey(signingKey);

string requirements = TokenRestrictionTemplateSerializer.Serialize(tokenTemplate);

List<ContentKeyAuthorizationPolicyRestriction> restrictions = new List<ContentKeyAuthorizationPolicyRestriction>()
{
new ContentKeyAuthorizationPolicyRestriction()
{
KeyRestrictionType = (int)ContentKeyRestrictionType.TokenRestricted,
Requirements = requirements,
Name = name
}
};

return restrictions;
}
Now you have to get the template of PlayReady license you will use. Media Services SDK offers a set of classes to make it easy :
private static string ConfigurePlayReadyLicenseTemplate()
{
PlayReadyLicenseResponseTemplate responseTemplate = new PlayReadyLicenseResponseTemplate();
PlayReadyLicenseTemplate licenseTemplate = new PlayReadyLicenseTemplate();
licenseTemplate.PlayRight.AllowPassingVideoContentToUnknownOutput = UnknownOutputPassingOption.Allowed;
responseTemplate.LicenseTemplates.Add(licenseTemplate);

return MediaServicesLicenseTemplateSerializer.Serialize(responseTemplate);
}
These helper methods are used like the following :
private static async Task ConfigurePlayReadyDynamicEncryptionAsync(
CloudMediaContext cloudMediaContext,
IAsset outputAsset,
Uri issuerName,
Uri scope,
byte[] signingKey)
{
IContentKey contentKey = null;
var assetContentKeys = outputAsset.ContentKeys
.Where(c => c.ContentKeyType == ContentKeyType.CommonEncryption);

if (!assetContentKeys.Any())
{
contentKey = await CreateCommonTypeContentKeyAsync(outputAsset, cloudMediaContext);
}
else
{
contentKey = assetContentKeys.First();
}

var tokenRestrictions = GetTokenRestrictions(
"My STS Token Restrictions",
issuerName,
scope,
signingKey);

var playReadyLicenseTemplate = ConfigurePlayReadyLicenseTemplate();

IContentKeyAuthorizationPolicyOption policyOption = await
cloudMediaContext.ContentKeyAuthorizationPolicyOptions.CreateAsync(
"Option with Token Restriction",
ContentKeyDeliveryType.PlayReadyLicense,
tokenRestrictions,
playReadyLicenseTemplate);

IContentKeyAuthorizationPolicy policy = await cloudMediaContext
.ContentKeyAuthorizationPolicies
.CreateAsync("ACS Authorization Policy");

policy.Options.Add(policyOption);
await policy.UpdateAsync();

contentKey.AuthorizationPolicyId = policy.Id;
await contentKey.UpdateAsync();

var licenseAcquisitionUrl = await contentKey.GetKeyDeliveryUrlAsync(ContentKeyDeliveryType.PlayReadyLicense);
string strLicenseAcquisitionUrl = System.Security.SecurityElement.Escape(licenseAcquisitionUrl.ToString());

Dictionary<AssetDeliveryPolicyConfigurationKey, string> assetDeliveryPolicyConfiguration =
new Dictionary<AssetDeliveryPolicyConfigurationKey, string>
{
{
AssetDeliveryPolicyConfigurationKey.PlayReadyLicenseAcquisitionUrl, strLicenseAcquisitionUrl
},
};

var assetDeliveryPolicy = await cloudMediaContext.AssetDeliveryPolicies.CreateAsync(
"PlayReady Delivery Policy",
AssetDeliveryPolicyType.DynamicCommonEncryption,
AssetDeliveryProtocol.SmoothStreaming,
assetDeliveryPolicyConfiguration);

outputAsset.DeliveryPolicies.Add(assetDeliveryPolicy);
await outputAsset.UpdateAsync();

}
As you can see, once you have the content key, the token restrictions and the PlayReady license to use, you can easily create the content key authorization policy and associate it to the content key. The next step is to create the content delivery policy to make the Media Services PlayReady licenses server able to generate the PlayReady license for your content.
Dynamic encryption with PlayReady is now configured !
Publish the asset
The last step is the asset’s publication. If you have already done this without PlayReady you will see that it works exactly in the same way. First, you have to create an access policy in your media services :
var accessPolicy = context.AccessPolicies
.Where(a => a.Name == "catchup_policy")
.AsEnumerable()
.FirstOrDefault();

if (accessPolicy == null)
{
accessPolicy = context.AccessPolicies
.Create("catchup_policy", TimeSpan.FromDays(100 * 365), AccessPermissions.Read);
}
Next, you will use this access policy to publish the asset via a locator :
var locator = context.Locators
.CreateLocator(LocatorType.OnDemandOrigin, asset, accessPolicy);

Console.WriteLine(locator.GetSmoothStreamingUri());
Et voilà !
Test the asset with PlayReady encryption
To test your new dynamic PlayReady encrypted asset you can go on http://sltoken.azurewebsites.net (developed by the AMS team, I think). Put the smooth streaming URL of your content and the token your STS has delivered, and it just works :
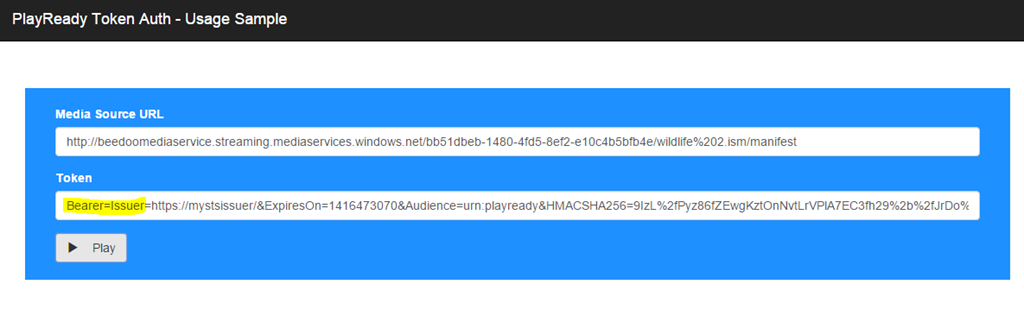
Note : to make the dynamic packaging working you have to enable at least one streaming unit in the streaming endpoint configuration of your media service.
Conclusion
In this blog post we have seen how to upload, encode and protect a content with PlayReady DRM, the new feature available with Azure Media Services. This feature is not yet supported on assets that were recorded from live channels, but in this case you can use AES encryption.
Hope this helps !
Julien
read more
25 Oct 2014 in
ASP.NET MVC
|
Microsoft Azure
Introduction
This post is part of a series of articles about developing a blog with ASP.NET vNext, Azure Website, DocumentDB and search services. If you would like to read another article in the series: - Develop a blog using ASPNET vNext, Azure Website, DocumentDB and Search services - Part 1- Develop a blog using ASPNET vNext, Azure Website, DocumentDB and Search services - Part 2
In the first article I explained what ASP.NET vNext is and how it is possible to create the Azure resources we’ll need via the preview portal. Today, I’m going to explain what Azure DocumentDB is and start the implementation of the data layer of the blog, using this service. NOTE: the alpha-4 version of ASP.NET vNext has been release with Visual Studio CTP 4 few days ago, so you can switch to this new version! Thanks to Adrien that reviews this blog post before I publish it !## Creation of the Visual Studio Solution
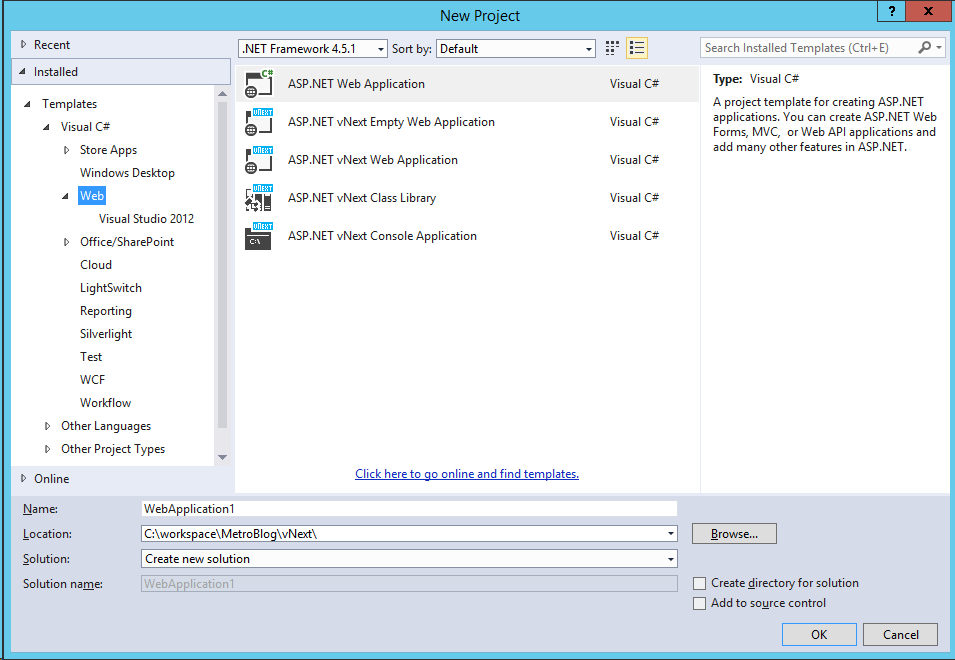
Before getting into Azure DocumentDB, we are going to create the blog solution in Visual Studio 14 CTP. In the web section, be sure to choose the new ASP.NET vNext project templates:
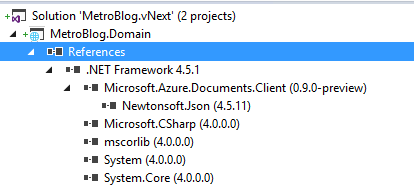
I chose to create an empty ASP.NET vNext application. Now, add a new ASP.NET vNext class library to the solution. It’s in this library that we will create the domain, queries and commands that work with Document DB. As you can see, both projects have a project.json file with some dependencies configuration. The project.json file defines two kinds of dependencies: external libraries such as MVC, Entity Framework, Document DB and frameworks dependencies. 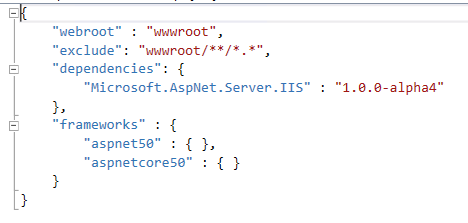
aspnet50 represents the full .NET framework and aspnetcore50 represents the small cloud optimized framework that comes with ASP.NET vNext. Referencing these two frameworks ensure that your application will build for both of them but also that all the libraries that you work with are supported by the cloud optimized Framework. In our case, it’s not possible because some of the Azure SDK librairies are not supported by this version, so you should remove the aspnetcore50 line from all project.json files. Now you can add a very simple C# class in the library project, to represent a blog post: ```csharp
namespace MetroBlog.Domain.Entities
{
using Newtonsoft.Json;
using System;
using System.Collections.Generic;
using System.Collections.ObjectModel;
/// <summary>
/// Represents a blog post
/// </summary>
public class Post
{
/// <summary>
/// Creates a new instance of the class class;
/// </summary>
public Post()
{
this.Tags = new Collection();
}
/// <summary>
/// Gets or sets the post identifier
/// </summary>
[JsonProperty(“id”)]
public Guid Id { get; set; }
/// <summary>
/// Gets or sets the publication date
/// </summary>
[JsonProperty(“publishDate”)]
public DateTime PublishDate { get; set; }
/// <summary>
/// Gets or sets the title
/// </summary>
[JsonProperty(“title”)]
public string Title { get; set; }
/// <summary>
/// Gets or sets the permalink
/// </summary>
[JsonProperty(“permalink”)]
public string Permalink { get; set; }
/// <summary>
/// Gets or sets the summary
/// </summary>
[JsonProperty(“summary”)]
public string Summary { get; set; }
/// <summary>
/// Gets or sets the content of the post
/// </summary>
[JsonProperty(“content”)]
public string Content { get; set; }
/// <summary>
/// Gets or sets the collection of tags
/// </summary>
[JsonProperty(“tags”)]
public Collection Tags { get; set; }
/// <summary>
/// Gets or sets a boolean that indicates if the post is published
/// </summary>
[JsonProperty(“isPublished”)]
public bool IsPublished { get; set; }
/// <summary>
/// Gets or sets the username of the author
/// </summary>
[JsonProperty(“username”)]
public string Username { get; set; }
}
}
## Using Azure DocumentDB to store the blog posts
### Configure the project to use Azure Document DB
###
DocumentDB is a NoSQL database that supports the storage of documents described as JSON. One of the big advantage of this kind of database is that the schema has not to be fixed: it can evolve with the application and data that are pushed inside the database are continuously indexed to provide the best performances. Because the document are stored as JSON format, it is really easy to push and extract data from DocumentDB. Microsoft provides a language that looks like SQL to query the database, so if you are not used to work with document database, don’t be afraid: it’s simple!
To reference the nuget package in your project, open the project.json file and start typing the name of the package (Microsoft.Azure.Documents.Client) in the dependencies section and click on the package in the IntelliSense:
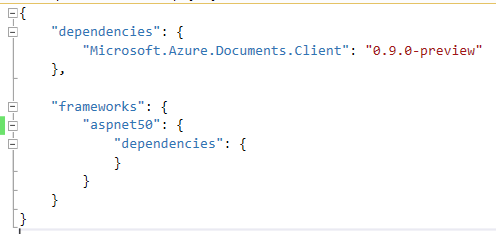
As soon as you save the file, the package will be downloaded and the project references updated:
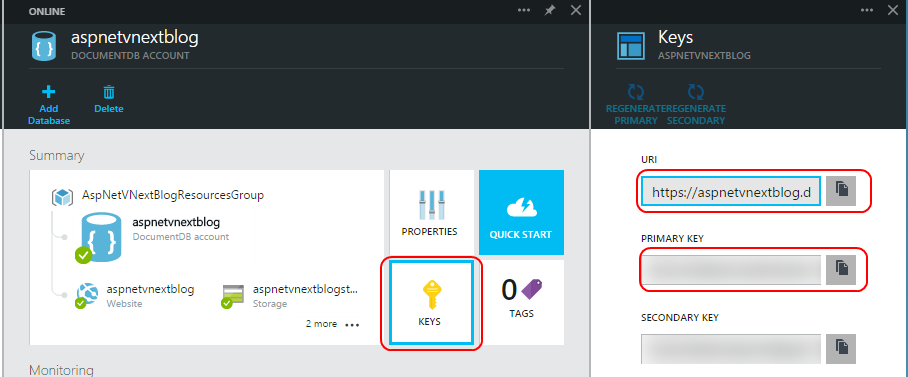
To start using the Azure Document DB with this SDK, you’ll need three information:
- The endpoint of the instance you have created
- The authorization key to access the database
- The id of the database to work with
The two first information are available on the preview Azure portal :
### Create a base class for commands and queries
I chose to work with queries and commands to read and create post from / to the document database. I also made a base class for all my commands and queries.
To work with Document DB in your application you need to create an instance of the DocumentClient class that comes with the NuGet package and takes the endpoint URL and the authorization key as parameters.
```csharp
public DocumentDbCommandQueryBase(DocumentDbOptions options)
{
this.options = options;
this.DocumentClient = new DocumentClient(new System.Uri(options.EndpointUrl), options.AuthorizationKey);
}
After that you can get the database to work with or create it if it’s not exist already :
protected async Task<Microsoft.Azure.Documents.Database> GetDatabaseAndCreateIfNotExists()
{
var database = this.DocumentClient.CreateDatabaseQuery()
.Where(d => d.Id == this.options.DatabaseId)
.AsEnumerable()
.FirstOrDefault();

if (database == null)
{
database = await this.DocumentClient.CreateDatabaseAsync(
new Microsoft.Azure.Documents.Database()
{
Id = this.options.DatabaseId
});
}

return database;
}
Relational databases like SQL Azure use table to store data. In Document DB, the documents are stored in document collections that you can get or create using the DocumentClient:
protected async Task<Microsoft.Azure.Documents.DocumentCollection> GetDocumentCollectionAndCreateIfNotExists(string collectionId)
{
var database = await this.GetDatabaseAndCreateIfNotExists();

var documentCollection = this.DocumentClient.CreateDocumentCollectionQuery(database.SelfLink)
.Where(d => d.Id == collectionId)
.AsEnumerable()
.FirstOrDefault();

if(documentCollection == null)
{
documentCollection = await this.DocumentClient.CreateDocumentCollectionAsync(
database.SelfLink,
new Microsoft.Azure.Documents.DocumentCollection()
{
Id = collectionId
});
}

return documentCollection;
}
Query the document database to list all posts
It’s possible to query the database with a pseudo SQL language or using LINQ. I chose the second one. You can find more information about querying DocumentDb here.
To create a query you also need to use the DocumentClient class and call the CreateDocumentQuery method:
var documentCollection = await this.GetDocumentCollectionAndCreateIfNotExists("Posts");

var postsQuery = this.DocumentClient
.CreateDocumentQuery<Domain.Entities.Post>(documentCollection.DocumentsLink)
.Where(p => p.IsPublished)
.AsQueryable();
You can call the extension method AsDocumentQuery on your linq query to get the underlying document query and execute it asynchronously:```csharp
var result = await documentQuery.ExecuteNextAsync();
Like the Azure table storage, DocumentDb uses continuation token when returning the documents :

```csharp
var posts = new List<Domain.Entities.Post>();
posts.AddRange(result);
while (documentQuery.HasMoreResults)
{
result = await documentQuery.ExecuteNextAsync<Domain.Entities.Post>();
posts.AddRange(result);
}
Add a post document in the database
Adding a document in the database is pretty simple! You have to get the documents collection on your database and then call the CreateDocumentAsync method with the entity as parameter:
var documentCollection = await this.GetDocumentCollectionAndCreateIfNotExists("Posts");
await this.DocumentClient.CreateDocumentAsync(documentCollection.SelfLink, this.post);
Cool, isn’t it ?
Conclusion
In this post we have seen how to use Visual Studio 14 CTP to create new ASP.NET vNext projects, handle the new dependencies file project.json and how to use the DocumentDB SDK to create / read data from / to the documents collection.
The code is now available on Github, so feel free to browse it if you want.
In the next post we will start to really use ASP.NET vNext to display the post !
Stay tuned
Julien
read more
06 Oct 2014 in
ASP.NET MVC
|
Microsoft Azure
Thanks to Adrien that reviews this blog post before I publish it !
Introduction
Few years ago I chose to develop my own blog instead of using a well-known blog engine like WordPress or DotNet Blog Engine, for example. Why? Because I use it as a sandbox project to test new Microsoft technologies. Today this blog is running in a Microsoft Azure Website, using SQL Database and Azure storage and is developed with ASP.NET MVC 5. I’m currently rewriting it with ASP.NET vNext (MVC 6), Azure DocumentDB and Azure Search. In this blog post series I will describe how I use these technologies to put the new version of my blog online  ## Getting started with ASP.NET vNext
What is ASP.NET vNext ?
ASP.NET vNext (also known as Project K) will be a really big change for developers because it has been redesigned from the beginning. ASP.NET has always been an awesome and powerful technology to develop web applications but today, after a lot of evolutions, it is very monolithic and has a big memory footprint even to create a simple web application. One of the goal of the ASP.NET team was to reduce this footprint and make the framework more composable, instead of having a huge library that contains a lot of (needed) stuff: System.Web. ASP.NET vNext comes with ASP.NET MVC 6, a web application Framework that merges ASP.NET MVC, Web API and Web Pages. Applications will be host agnostic exactly as ASP.NET Web API is today: you can host it in IIS, or self-host it in a console application, for example. Because the Framework is totally composable, you will have to change some of your development habits. ASP.NET vNext projects use NuGet to resolve all dependencies, even .NET Framework dependencies. One of the coolest thing (IMO) that comes with this new version is the Cloud Optimized .NET Framework: an 11MB Framework divided into a set of NuGet packages that you can include (or not) in your project. That contributes to reduce the memory footprint of your applications but also allow to run applications that use different versions of the .NET Framework side-by-side. ASP.NET vNext uses the Roselyn compiler to build web applications dynamically so it comes with a better development experience. You can choose your editor and your favorite platform to develop your application. The ASP.NET team has worked with the Mono team to make ASP.NET vNext and the Roselyn compiler available on Mac and Linux: come as you are and develop web app with ASP.NET! Even if it looks like being a huge update of ASP.NET (and it is!), don’t be afraid: if you know ASP.NET MVC or Web API, you will develop with ASP.NET vNext finger in the nose J If you don’t know ASP.NET MVC, take the time to read some stuff about it before this article. ### Wow, that looks awesome, how do I start ?
Currently, one of the ways to develop ASP.NET vNext is to download the latest CTP of Visual Studio 14 from this page. You can also use one of the templates available in the this page. Once you have Visual Studio 14 CTP (or your favorite IDE, for those who are using a Mac, this article may be helpful: this page) you are ready to develop with ASP.NET vNext. ## Create the services on Azure portal
The blog uses different services on Microsoft Azure: - Website : the blog application host - Storage account : images displayed in the blog posts are stored in the Azure blob storage - DocumentDB : a NoSQL document database used to store the blog posts - Search : service that provides fast-search indexing and querying, used to search in blog’s posts
All these services are currently available on the preview of the new Azure Portal. You can access it at http://portal.azure.com. One of the coolest features that comes with this new portal is the possibility to group resources by business application into resource groups. So in the example of the blog it is possible to regroup each service instance in a single group and manage them together. Also, resource groups are very useful to get a pricing overview of your business app. After selecting your subscription, click on the + button at the bottom left of the portal and choose to create a new website. First, you have to name the website. Next you can choose a hosting plan that will determine the pricing rules that will apply for billing (I choose free plan in this case). Now you can create a new resource group: <ol> - Click Resource group - Click Create a new resource group - Give a name to the group and click OK
</ol> 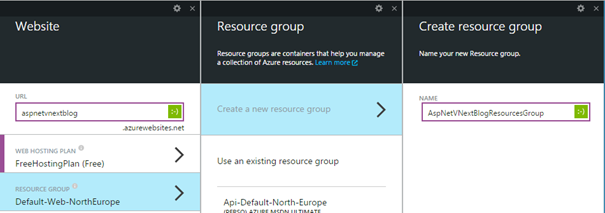
Choose the subscription and the location where you want to create the website. I choose West Europe. Finish the website creation by clicking on Create. While the website is being created, click the + button again to add a new Storage account resource. Choose a name, the tiers you want and select the resource group that you have created with the website: 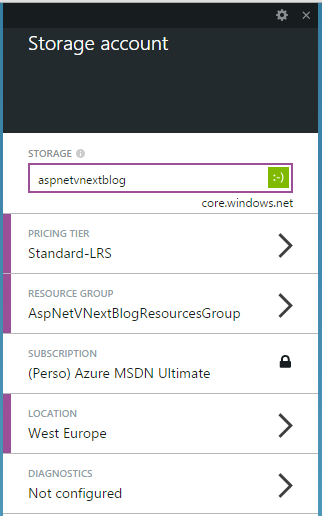
Click Create to finish the Storage account creation. Add a new DocumentDB to the resource group. Click the + button, choose DocumentDB in the list. Give it a name, select the good resource group and the location where your want to create it: 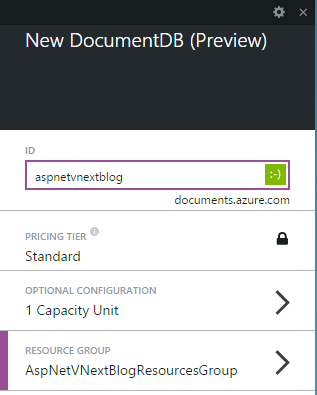
Finish the creation by clicking on Create. Notes: DocumentDB and Search services are currently in preview. If you don’t see them in the Azure Portal, you have to activate them on your subscription via the preview features portal.Create a new Search service in the resource group: click the + button, choose Search in the list. Give it a name, choose the tiers, the resource group and the location where you want to create it: the preview features portal
Conclusion
Your environment is now ready to develop with ASP.NET vNext, Azure Website, DocumentDB and Search services. In the next post, we will create the blog domain model and develop the data access services on Azure DocumentDB. Julien 
read more
13 May 2014 in
ASP.NET MVC
|
ASP.NET Web API
Few days ago Microsoft has announced the availability of the .NET Framework 4.5.2. This new version brings some new features and improvements to ASP.NET. It is now very easy to run some background tasks from an ASP.NET Web app, using the new HostingEnvironment API. It allows to enqueue background tasks (as simple as working with the thread pool) and avoids IIS app pools shutdown until the tracked tasks are completed.
For a complete description of this new .NET Framework version, go to this page. You can find the runtime and developer pack installers this page.
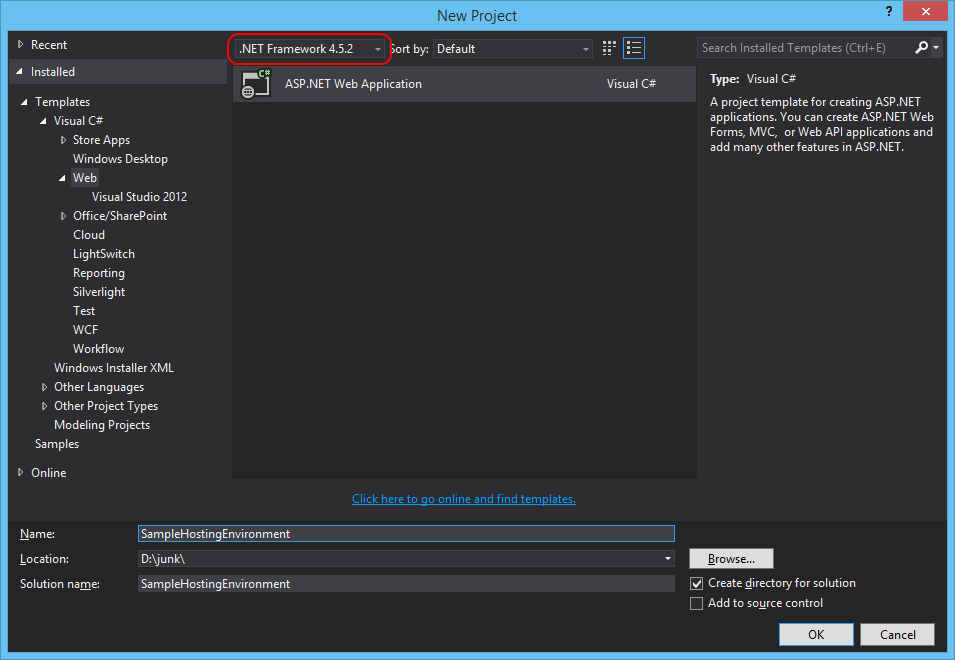
Once you’ve installed .NET Framework 4.5.2 and the developer tools, open Visual Studio and create a new web application project that targets the .NET Framework 4.5.2 :
In this post, I have choose to use the HostingEnvironment api to queue thumbnail generation when the user uploads a picture (really simple scenario). The HostingEnvironment class defines a method QueueBackgroundWorkItem that takes an Action or a Func<CancellationToken,Task> as parameters.
To generate the thumbnail I have used the System.Drawing API and created the following simple helper :
public class ThumbnailHelper
{
public static Task CreateThumbnail(string filePath)
{
return Task.Factory.StartNew(() =>
{
Image originalImage = Bitmap.FromFile(filePath);

int thumbWidth, thumbHeight;

thumbWidth = 250;
thumbHeight = (originalImage.Height * 250) / originalImage.Width;

Image thumbnail = originalImage.GetThumbnailImage(thumbWidth, thumbHeight, null, IntPtr.Zero);

string thumbFileName = string.Format("{0}_thumb{1}", Path.GetFileNameWithoutExtension(filePath), Path.GetExtension(filePath));
string thumbFilePath = Path.Combine(Path.GetDirectoryName(filePath), thumbFileName);

thumbnail.Save(thumbFilePath);
});
}
}
The cshtml code :
@{
ViewBag.Title = "Upload a new picture";
}

## @ViewBag.Title

@using(Html.BeginForm("Upload", "Picture", FormMethod.Post, new{ enctype = "multipart/form-data"}))
{
@Html.AntiForgeryToken()
<div class="form-group">
<label for="file">Choose a picture</label>
<input type="file" name="file" id="file" />

<div class="form-group">
<input type="submit" value="Upload and create thumbnail" class="btn btn-primary"/>

}
and the controller code :
public class PictureController : Controller
{
public ActionResult Upload()
{
return View();
}

[HttpPost]
[ValidateAntiForgeryToken]
public ActionResult Upload(HttpPostedFileBase file)
{
var appDataPath = Server.MapPath("~/App_Data");
string filePath = Path.Combine(appDataPath, file.FileName);
file.SaveAs(filePath);

HostingEnvironment.QueueBackgroundWorkItem(cancellationToken =>
{
return ThumbnailHelper.CreateThumbnail(filePath);
});

return RedirectToAction("Upload");
}
}
As you can see in the code above, just after that the picture is saved in the App_Data folder, a task is queued using the HostingEnvironment api. Now, you can be sure that the app pool of your application will not stop until all the thumbnails are generated.
Hope this helps 
Julien
read more